14 DIY Wall Art Projects That Turn Blank Walls Into the Best Part of the Room
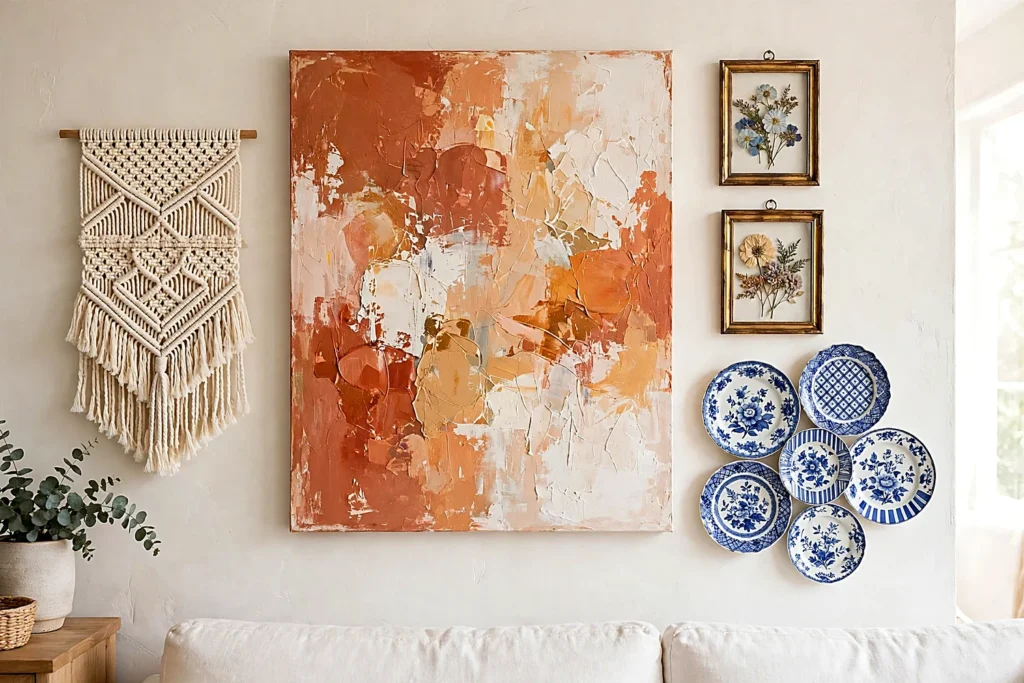
Blank walls make even a furnished room feel unfinished, and the fix does not need a gallery budget. These diy wall art projects start with things most homes already have — spare paint, leftover fabric, a handful of frames — and end with walls that finally say something about the people who live there.
Every project below is a weekend job at most, and most take under an hour once the supplies are gathered. You will find painted canvas, pressed flowers, woven yarn and even dinner plates turned into art, each with honest costs and the shortcuts that actually work. Pick one wall, start with the diy wall art projects that match your supplies, and let the room change by Sunday. By the end, these diy wall art projects will have your walls looking collected, not decorated.
Table of Contents
- Abstract Canvas Painting in Three Colors
- Pressed Flower Frames with Glass
- Woven Yarn Wall Hanging on a Dowel
- Stenciled Accent Panel Behind the Sofa
- Painted Wood Pallet Sign
- Gallery Wall of Thrifted Frames
- Paper Quilling Art in a Shadow Box
- Sunburst Mirror from Wooden Dowels
- Photo Clip String with Fairy Lights
- Botanical Leaf Prints with Real Leaves
- Macramé Wall Hanging with a Branch
- Chalkboard Art Panel for the Kitchen
- Decorative Plate Wall in Blue and White
- Framed Fabric Panels from Leftover Textiles
- Frequently Asked Questions
- Final Thoughts: Walls That Tell Your Story
Abstract Canvas Painting in Three Colors
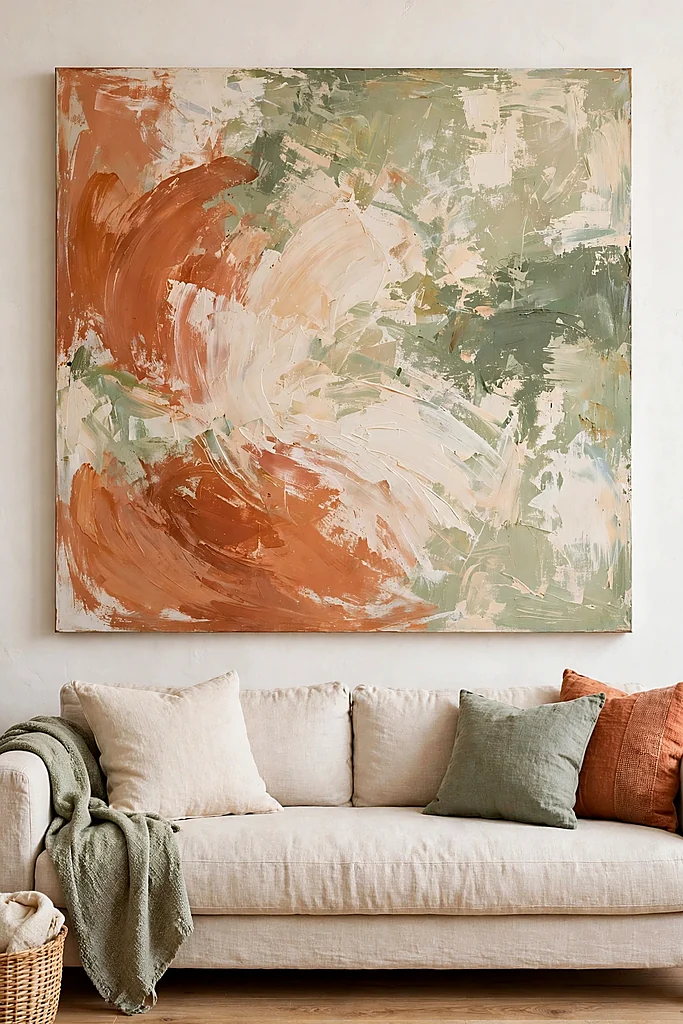
A big abstract canvas is the fastest way to fill a wide wall, and limiting yourself to three colors keeps it looking designed instead of chaotic. Pick one deep shade, one mid tone and one light neutral — terracotta, cream and sage are the trio in the photo — and let them carry the whole piece.
Work with a wide brush and loose, sweeping strokes, turning the canvas a quarter turn every few minutes so no single direction takes over. Leave some areas thin and quiet; the empty patches are what make the bold strokes look intentional, and they give the eye somewhere to rest. Few diy wall art projects forgive a shaky hand this kindly.
Of all the diy wall art projects in this list, this is the one renters love most, because a single canvas covers a lot of wall, weighs almost nothing and comes down without a trace. Lean it on a mantel or hang it from one picture hook.
- One large blank canvas, 24×36 inches or bigger
- Acrylic paint in three colors plus white
- A 3-inch flat brush and a smaller detail brush
- Painter’s tape for a clean border edge
The same collected feeling anchors these vintage home decor ideas.
Pressed Flower Frames with Glass
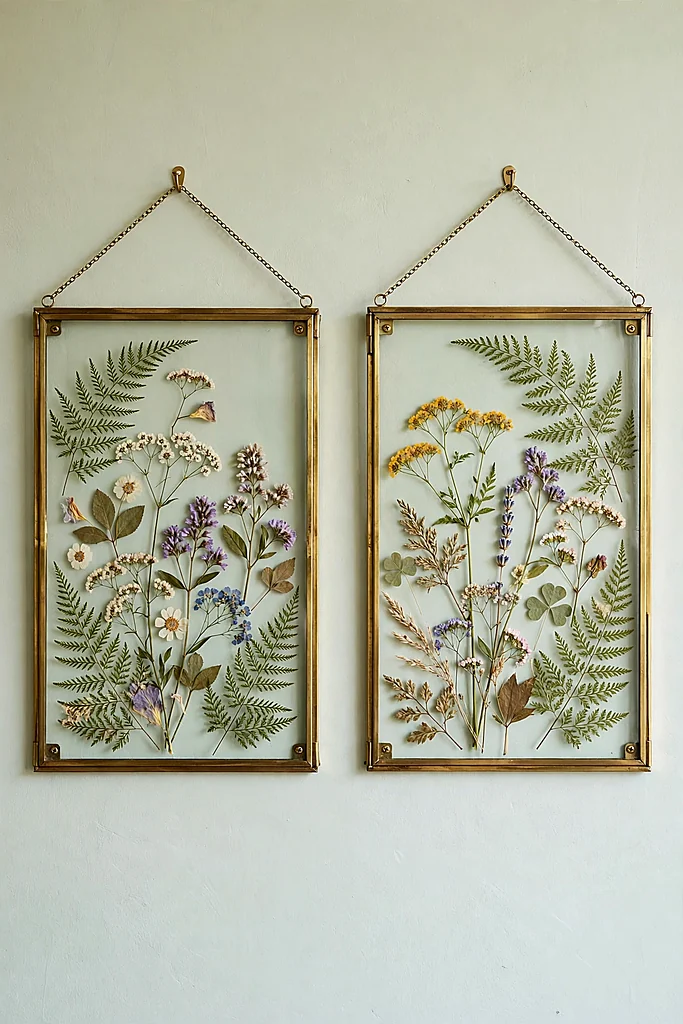
Pressed flowers turn a ten-minute garden walk into art that lasts for years. Pick flat blooms — pansies, violas, fern fronds and Queen Anne’s lace press best — and sandwich them inside two sheets of glass so the wall color shows through and the whole frame feels light. They are also among the quickest diy wall art projects to finish once the pressing is done.
Float frames like these are the gentlest of all diy wall art projects for beginners: there is no cutting, no painting and no way to really fail. Arrange the flowers on the back glass, lower the front sheet slowly, clip the frame shut and hang the pair where morning light can reach them.
Pressing shortcut: No flower press? Slip blooms between parchment sheets inside your heaviest book, stack two more books on top, and wait ten days for the truest colors.
Pressed Flower Frames: Time and Cost
Pressed frames belong in calm rooms like these winter bedroom decor ideas.
Woven Yarn Wall Hanging on a Dowel
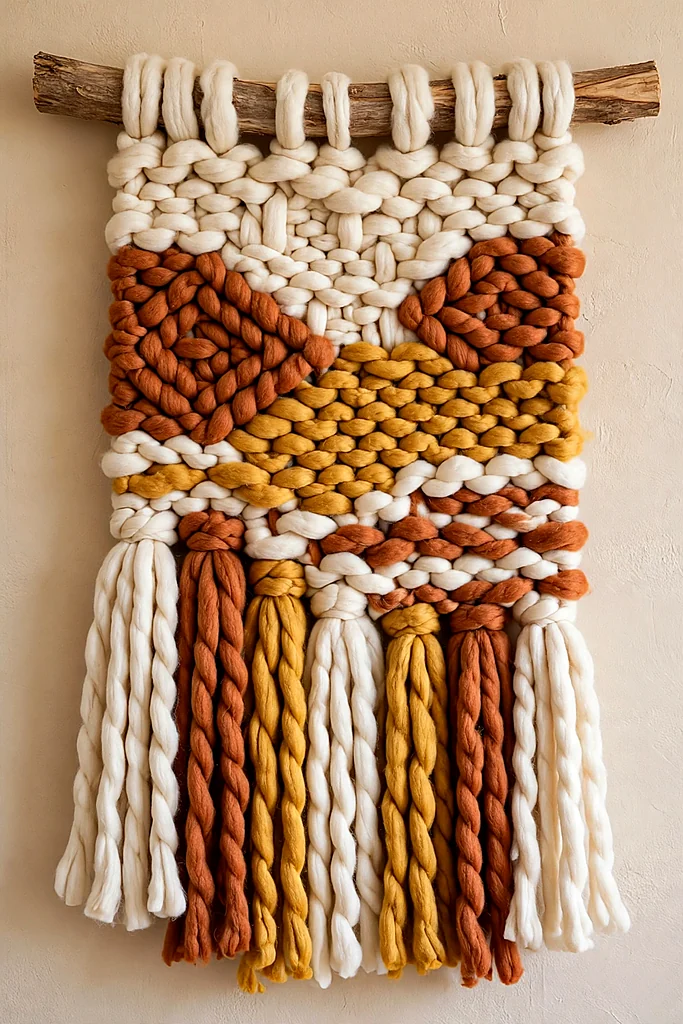
A woven hanging brings softness that flat art cannot — the fringe moves a little when a door opens, and the texture makes a plain wall feel warm. You do not need a loom: a wooden dowel, chunky yarn in three shades and a pair of scissors are the whole toolkit.
Cut your yarn into equal lengths, fold each bundle in half and loop it over the dowel with a simple lark’s head knot, working from the center outward. Alternate thick and thin bundles so the surface has rhythm, and leave the center section lighter if you want a sunrise shape. It is among the coziest diy wall art projects for a bedroom corner.
Once the rows are on, weave a few horizontal strands through the vertical bundles near the top to lock everything in place. This is the only fiddly minute of the job; after it, the hanging holds its shape for years and only needs an occasional shake outdoors to lose the dust.
Pieces like this explain why diy wall art projects keep beating store-bought prints: the result is sized exactly for your wall, colored exactly for your room and finished in one relaxed evening. Trim the fringe into a point, a curve or a straight hemline — the shape is the signature.
A woven hanging is right at home among these cozy winter living room decor ideas.
Stenciled Accent Panel Behind the Sofa
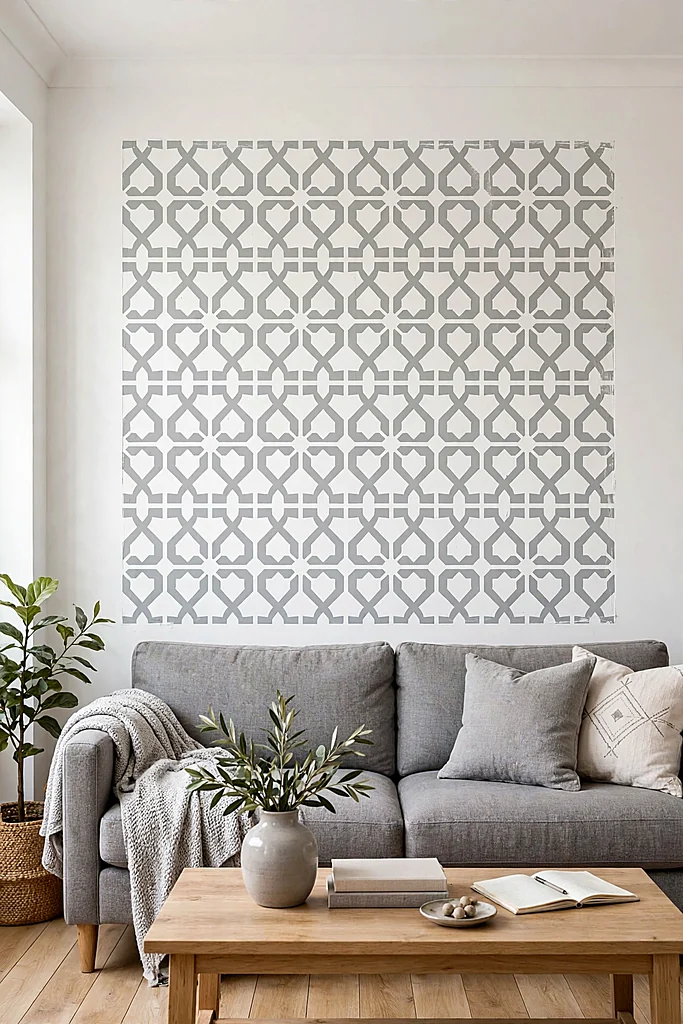
A stenciled panel gives you the drama of wallpaper with none of the commitment, because it lives inside one painted rectangle instead of covering the whole wall. Tape off a panel the width of your sofa, paint the base coat, then repeat a geometric stencil in a shade two tones deeper.
The secret is a nearly dry brush: dip, dab most of the paint off on a paper towel, then pounce lightly through the stencil. Wet paint bleeds under the edges and ruins the crisp lines, while a dry brush builds the pattern in two patient passes that dry almost instantly.
- Wipe the stencil clean every three repeats — buildup softens the edges
- Start from the top center and work outward so the pattern stays symmetrical
- Keep leftover base paint for touch-ups; the panel repaints in one coat
Reversible by design: One coat of the original wall color erases the pattern in an afternoon — exactly why renters rank stencils among the safest diy wall art projects.
For the wall on a smaller stage, these hallway table decor looks do the same trick in miniature.
Painted Wood Pallet Sign
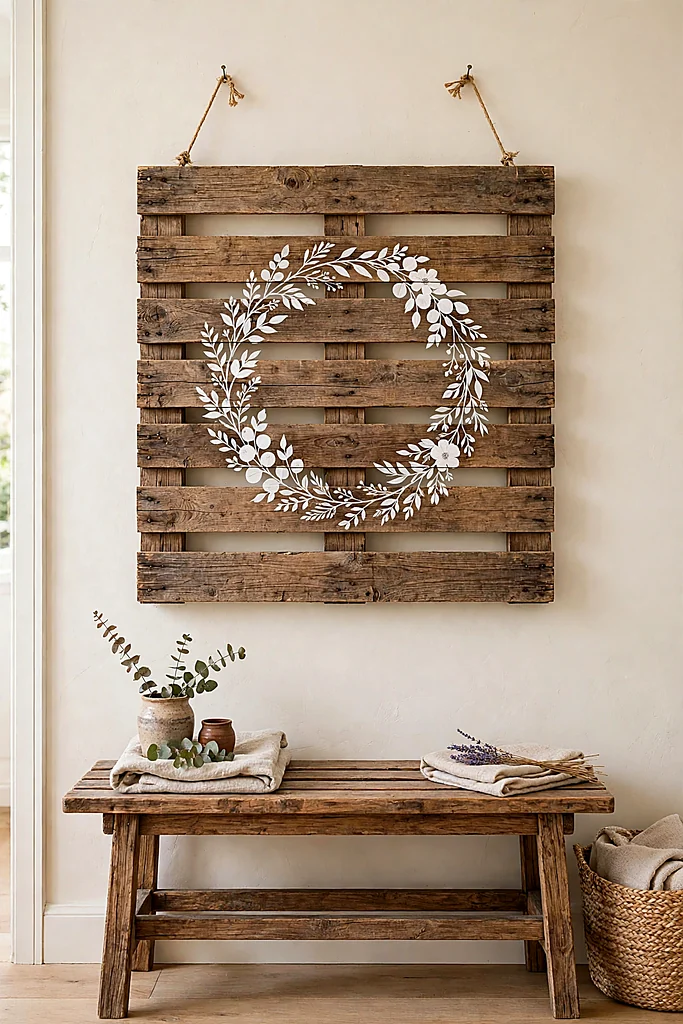
A pallet sign brings the farmhouse warmth that prints only imitate, because real wood has grain, knots and weight. Sand a pallet board — or a new pine plank if pallets are scarce — until the edges feel smooth, then stain it one shade deeper than your floor for an easy match.
Paint your design in flat white acrylic: a simple laurel wreath, a house number or a short word all work at this scale. Signs are the most forgiving diy wall art projects on this list — if a line wobbles, sand it back, restain the patch and paint it again.
Seal the finished board with a matte water-based sealer so the paint survives kitchen steam and porch humidity alike. Hang it from a French cleat or two D-rings; pallet wood is heavier than it looks, and a sign this size deserves fixings that will not creep down the wall. Simple, sturdy diy wall art projects like this one often outlast trends by decades.
Wood Sign Finishes Compared
Smaller handmade pieces wait in these handmade christmas gift ideas.
Gallery Wall of Thrifted Frames
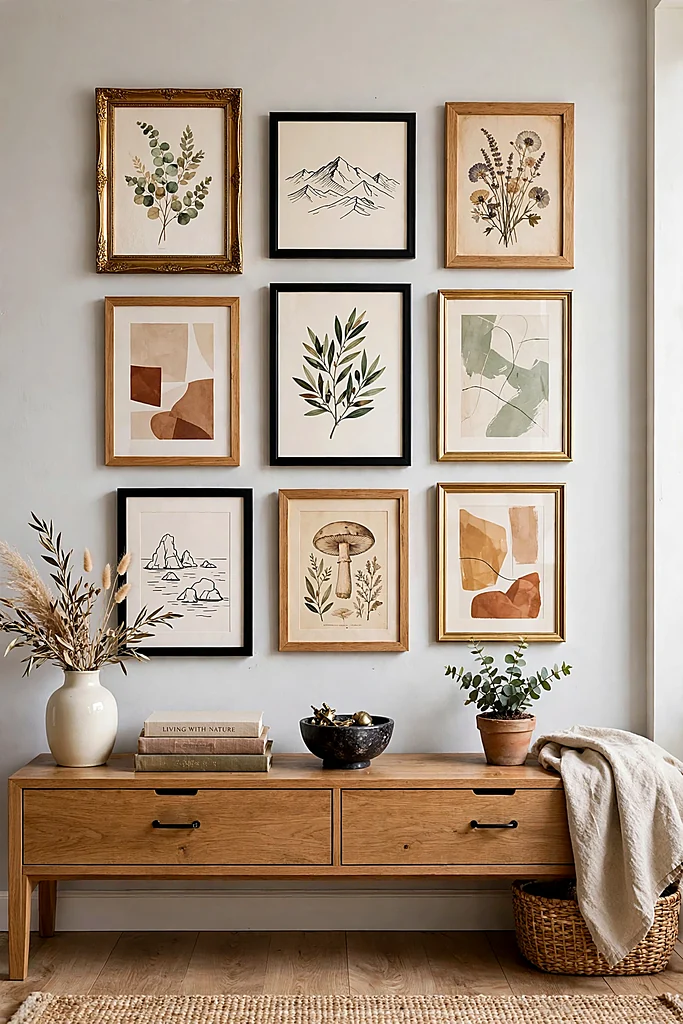
A gallery wall is where thrifted frames stop looking like leftovers and start looking collected. Hunt for frames in mixed finishes — gilt, black, raw wood — but keep one thing consistent, either the mat color or the art’s palette, so the wall reads as one idea instead of ten accidents.
Lay the whole arrangement on the floor first and live with it for a day before any nail goes in. Photograph the layout, tape paper templates to the wall in the same shapes, and only then hang the real frames — the paper step saves a dozen unnecessary holes. That patience is what separates lasting diy wall art projects from rushed ones.
Fill the frames with whatever you already love: postcards, children’s drawings, fabric offcuts, a menu from a trip. The art inside a gallery wall matters less than the rhythm of the shapes, and personal pieces are the ones guests actually stop and ask about.
Start with five frames and grow the wall over months, adding a piece whenever a thrift run turns up something good. Slow collecting is the soul of diy wall art projects like this one — the wall stays interesting because it is never really finished, and neither is the hunt.
- Keep frames 2–3 inches apart — tighter reads cluttered, wider reads lost
- Hang the center of the arrangement at eye level, about 57 inches
- Mix one large anchor frame with smaller ones for balance
- Repeat each finish at least twice so nothing looks accidental
See how a full wall carries the season in these christmas living room decorations.
Paper Quilling Art in a Shadow Box
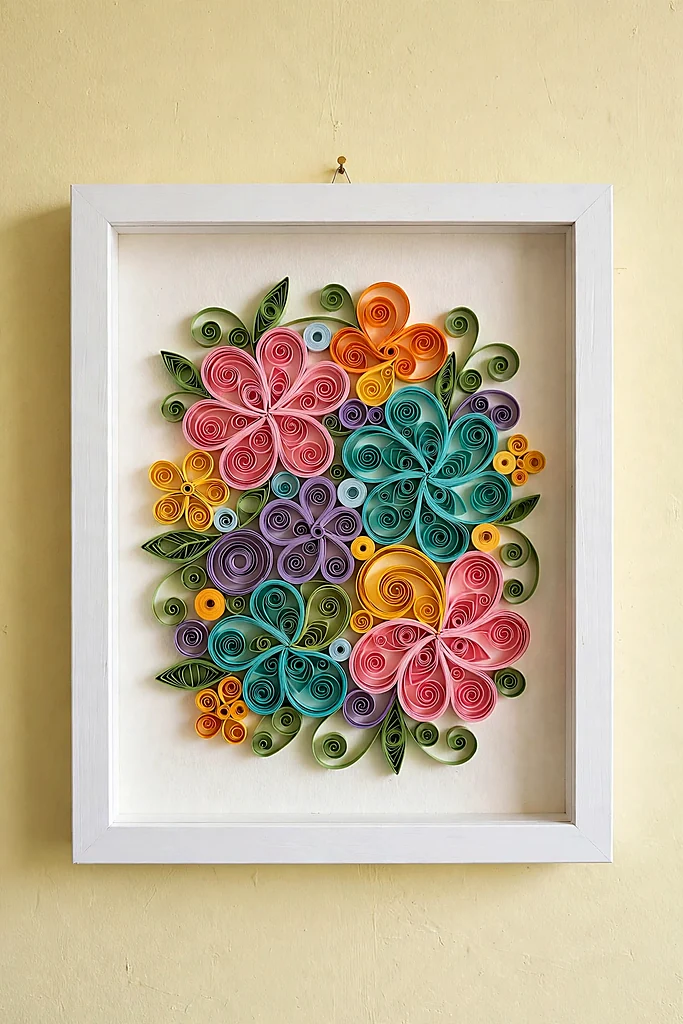
Paper quilling looks impossibly intricate, but every swirl is just a strip of paper rolled around a toothpick, pinched into a petal or a teardrop, and glued at the edge. A shadow box frame gives the coils depth, and under room light the shadows do half the decorating.
Work from a printed template placed under wax paper, building each flower separately before arranging the bouquet on the backing board. Keep the color story tight — three shades of one color plus green reads elegant, while a full rainbow can tip the piece from art into craft-fair busy. It is one of the few diy wall art projects that changes with the light, throwing longer shadows by evening.
First-piece advice: Roll one simple flower shape twenty times before attempting a bouquet. Repetition teaches your fingers the tension, and the best flower becomes your centerpiece.
Paper is not the only patient craft here — these diy christmas snow globes reward the same slow hands.
Sunburst Mirror from Wooden Dowels
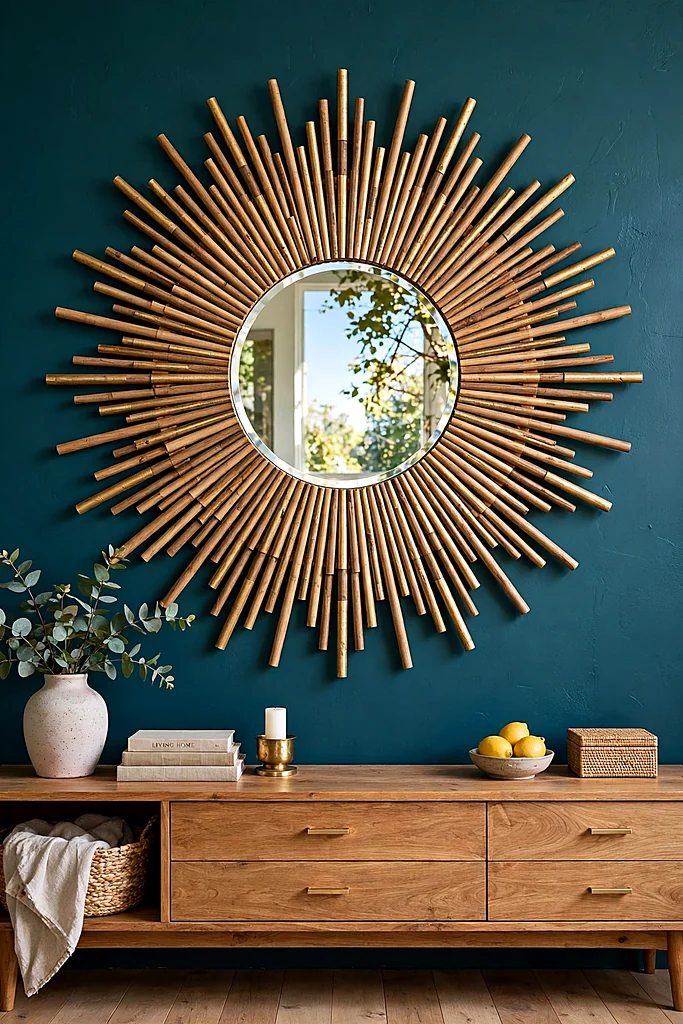
A sunburst mirror is the hardest-working piece on any wall — it decorates like art and brightens like a window. The frame is nothing but wooden dowels or bamboo skewers glued in rays around a small round mirror, sprayed gold once the glue has fully cured overnight. It is also one of the most imitated diy wall art projects in designer rooms.
Lay the rays on a drawn circle before gluing anything, alternating long and short dowels so the burst looks hand-grown rather than machined. A hot-glue gun speeds the work, but wood glue holds longer; either way, spray two light coats of paint instead of one heavy, dripping one.
Hang it where it can catch real light — opposite a window or above a sideboard with a lamp — and it will double the brightness of the corner. Few diy wall art projects pay you back this visibly: ten dollars of dowels performing like a designer mirror.
- Cut dowels in two lengths, 8 and 12 inches, for a natural burst
- Glue a small cardboard disc to the back to hold all ray ends
- Mask the mirror glass with tape before spraying
Sunburst Sizes and Dowel Counts
For a richer take on shine, browse these luxury christmas decor ideas.
Photo Clip String with Fairy Lights
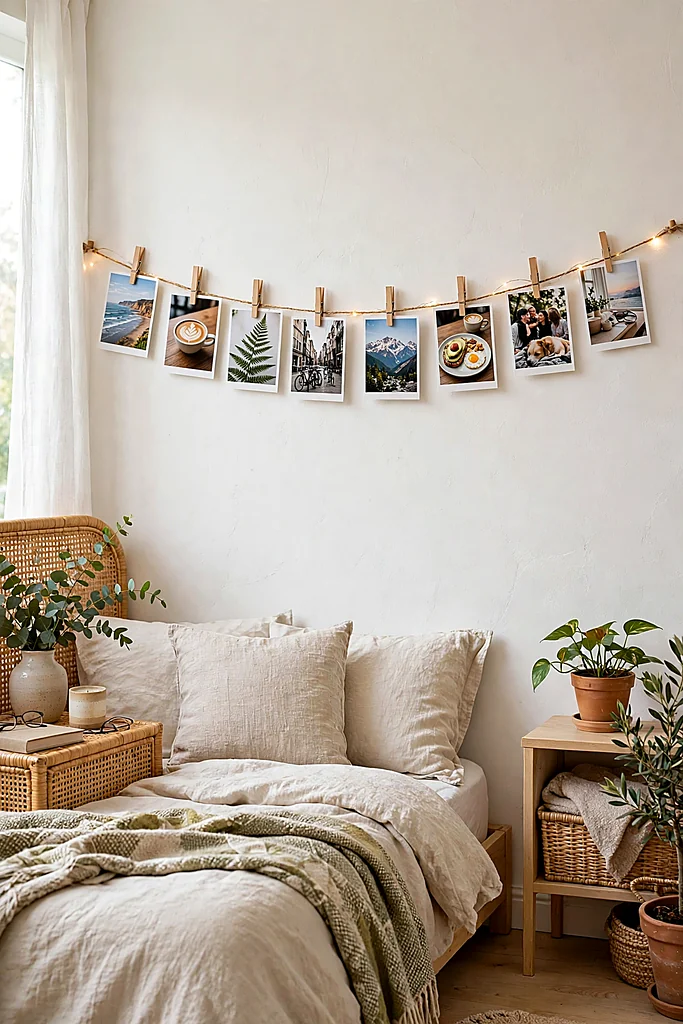
A photo clip string turns the pictures trapped in your phone into the warmest art in the house. Stretch two parallel strings across the wall, clip prints along them with mini wooden pegs, and weave a copper-wire string of fairy lights through the rows so every photo glows a little. It might be the most personal of all diy wall art projects, since every picture is yours.
Print on matte paper if you can — glossy prints glare under the lights and cheapen the effect. Of all the diy wall art projects here, this is the only one that keeps changing: swap ten prints every season and the wall becomes a slow, honest diary of the year.
Photo String: What You Need
The same string-and-pegs trick decorates parties too, as these friendsmas party ideas show.
Botanical Leaf Prints with Real Leaves
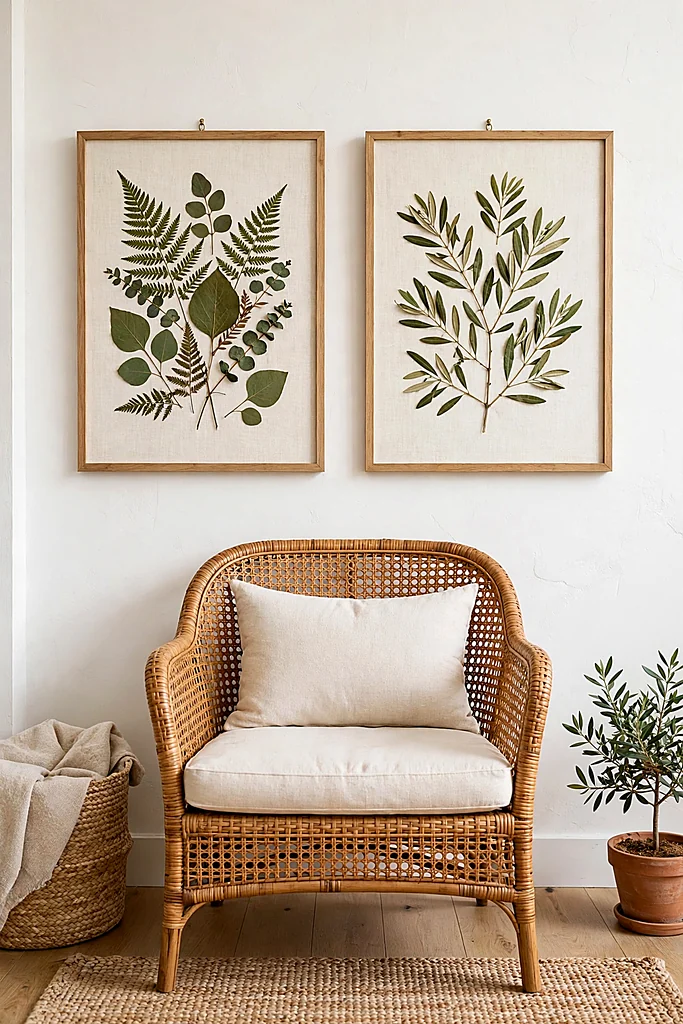
Real leaves make prints no stamp can copy, because every vein and nibbled edge prints with them. Choose firm, flat leaves — fern, eucalyptus, monstera and olive branches all hold their shape — and brush them with a thin, even coat of acrylic paint on the veined underside.
Press the painted leaf onto cream linen or heavy watercolor paper with the heel of your hand, rolling gently from stem to tip so every vein transfers. Peel slowly from the stem end. A slightly faded patch is not a flaw; it is the proof the print is real. Botanical printing is one of the oldest diy wall art projects, older than photography itself.
Make pairs rather than singles: two prints from the same plant, framed alike, hang with a calm symmetry that suits bedrooms and hallways. Date the back of each frame in pencil — in five years the note about where the leaf came from will matter more than the print.
Leaves keep for a week in a damp paper towel inside the fridge, so one garden walk can supply a whole hallway. Gentle, nearly free and quietly elegant, prints like these are diy wall art projects at their most honest — nature does the drawing, you do the framing.
Leaf choice matters: Waxy leaves like magnolia resist paint and print patchy. If a leaf feels leathery, sand it very lightly or choose a softer leaf — ferns and olive branches almost never disappoint.
Leaves leave the wall and land on the table in these christmas table decorations.
Macramé Wall Hanging with a Branch
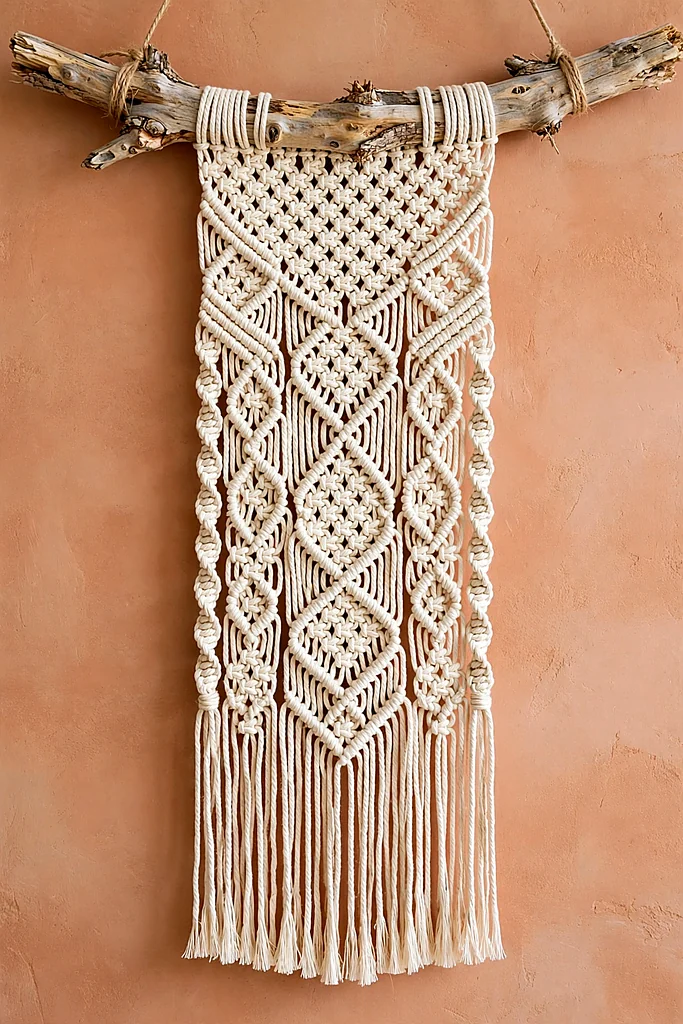
Macramé rewards patience more than skill: the entire vocabulary is three knots — the lark’s head, the square knot and the half hitch — repeated until a pattern emerges. Hang your cords from a fallen branch instead of a dowel and the piece gains the organic edge stores charge extra for. It remains one of the most loved diy wall art projects of the last decade.
Cotton cord in a natural, unbleached shade hides small mistakes and suits almost every room color. Work standing with the branch hung at eye level; knotting downward at a table twists your rows and tires your shoulders, while a hanging setup keeps every row honest and even.
Leave the bottom edge uneven on purpose, following the branch’s own curve — the imperfection is what separates handmade macramé from the machine-made kind. As diy wall art projects go, this one is slow, meditative and nearly silent, which makes it perfect evening work in front of a film.
If knots please your hands, these crochet patterns for beginners are the natural next craft.
Chalkboard Art Panel for the Kitchen
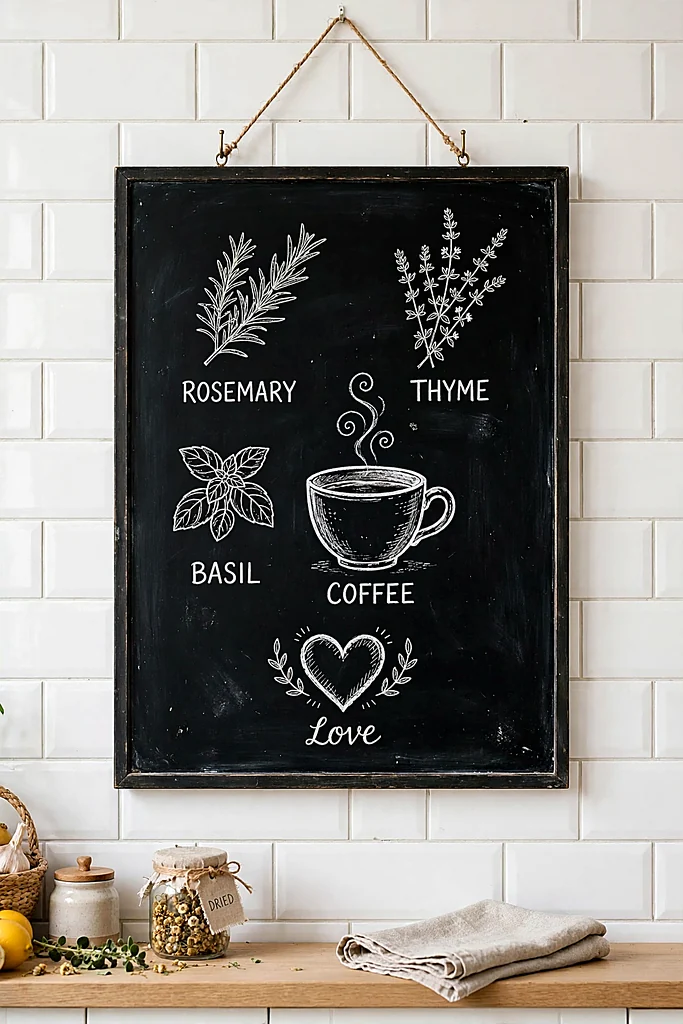
A chalkboard panel is wall art that earns its keep: menus, market lists and small drawings rotate through the same frame all year. Any smooth board takes chalkboard paint — two coats, sanded lightly between — and a frame around it turns a utility into a deliberate piece of kitchen decor.
Season a new board before its first drawing by rubbing the side of a chalk stick over the whole surface and wiping it off; unseasoned boards keep a ghost of the first drawing forever. Real chalk beats dustless sticks for that soft, shaded look café boards are loved for. That makes the chalkboard one of the hardest-working diy wall art projects of all — the art refreshes whenever the menu does.
- Draw big and simple — herbs, cups and hearts read best from across the room
- Fix a finished drawing with a light mist of hairspray to stop smudging
- Rest a small potted herb on the frame ledge to soften the black
- Refresh the design monthly so the wall never goes stale
Chalkboard Panel Sizes
Chalk lettering labels the buffet beautifully among these friendsgiving table settings.
Decorative Plate Wall in Blue and White
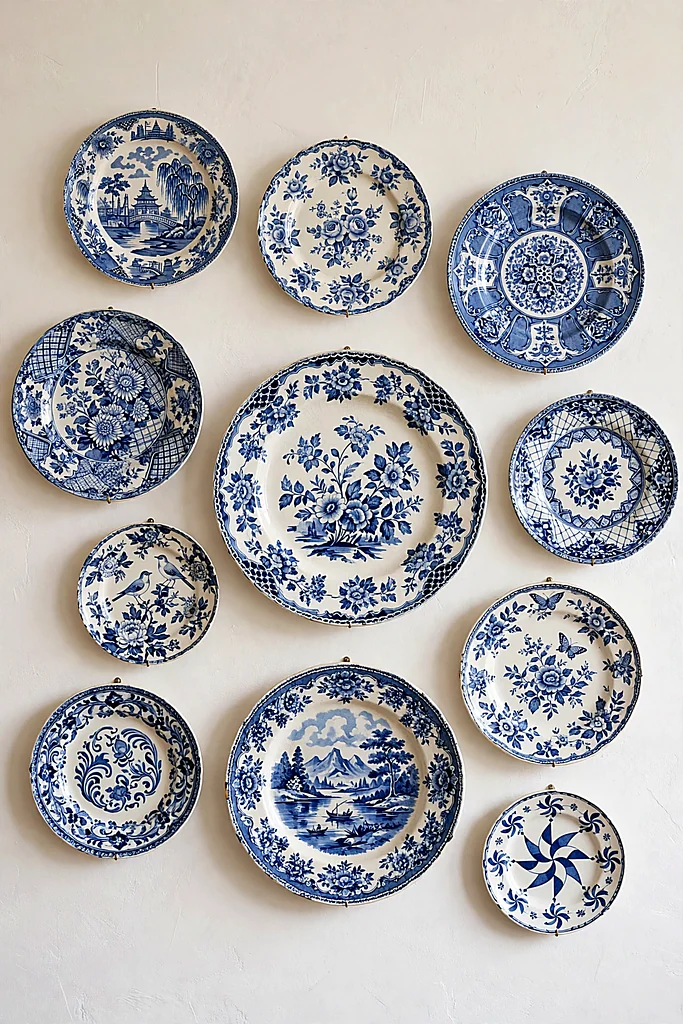
Decorative plates are art the kitchen already owns. Blue-and-white china — collected from grandparents, thrift shelves and flea markets — hangs together beautifully because the palette does the coordinating, and mismatched patterns stop mattering the moment the plates share two colors and a wall. Plate arranging is one of the oldest diy wall art projects in the book.
Arrange the layout on the floor around one hero plate, working outward from large to small, then trace each plate on paper and tape the templates up before drilling. Plate hangers with springs beat adhesive discs for heavy pieces; a plate that survived fifty years deserves hardware that will too.
Leave a palm’s width of wall between plates so each pattern breathes, and let one odd plate — a single green or a lone red — break the blue on purpose. Plate walls are diy wall art projects with a memory attached: every guest asks about at least one plate.
Hanging safety: Never hang plates over a sofa or a bed, however strong the hanger feels. A hallway or dining wall is the classic spot — admired daily, and nobody sits beneath the china.
Plates come down off the wall for these bring a board night ideas.
Framed Fabric Panels from Leftover Textiles
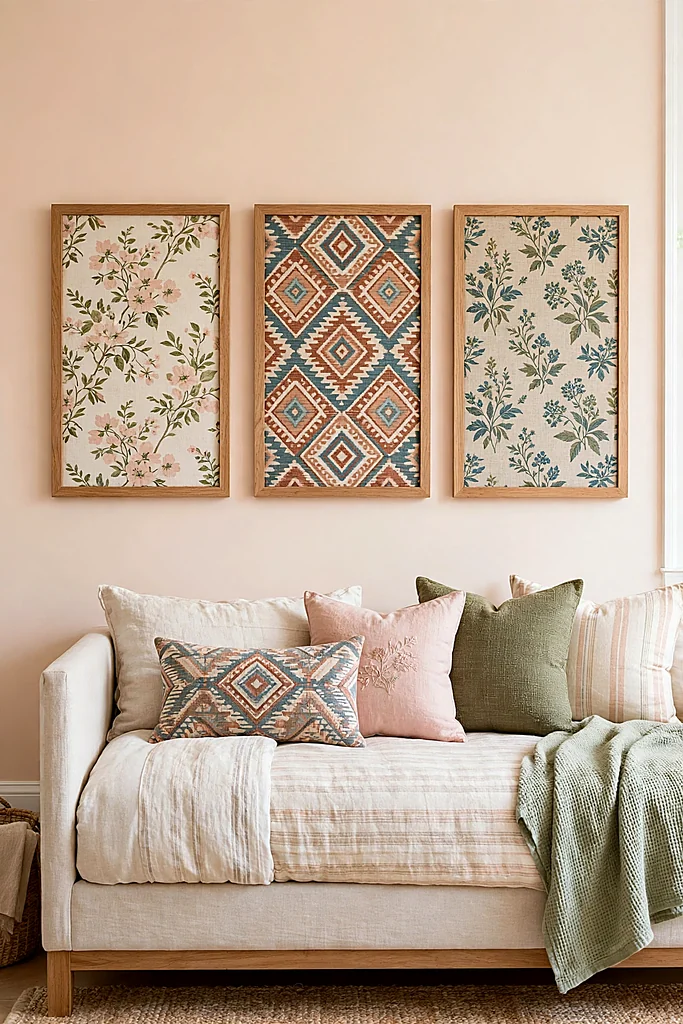
Every sewing basket hides future art: the half-metre of floral fabric too pretty to cut, the geometric remnant from curtains, a scarf from a market trip. Stretched over a frame and stapled at the back, fabric becomes a panel with real texture that paint cannot imitate.
Use cheap canvas stretchers or plain wooden frames and pull the fabric drum-tight, stapling the centers first and the corners last. Iron every piece before stretching — a crease locked under tension will catch the light forever — and trim the excess at the back for a clean, flat hang.
Hang three panels in a row and you have a fabric story across the wall: one print, one stripe and one solid pulled from the print’s colors. Textile panels are the softest diy wall art projects in this collection, and in echoey rooms they genuinely quiet the sound.
When the room changes, the art changes with it — a panel re-covers in fifteen minutes with the next leftover. Keep a small stash of offcuts from every sewing project from now on; the wall above the sofa is quietly collecting its next exhibition, one fabric scrap at a time. Keep the offcuts, and your future diy wall art projects are already half supplied.
Fabric Panel Sources
Fabric softens the tree corner too, throughout these christmas decorations.
Frequently Asked Questions
How much do diy wall art projects usually cost?
Most diy wall art projects in this list cost between nothing and twenty dollars, because they start with supplies homes already own — leftover paint, spare frames, fabric offcuts. The gallery wall and the sunburst mirror are the priciest here, and even they stay under thirty dollars if the frames and mirror come from thrift stores.
What is the easiest project for a complete beginner?
Start with the pressed flower frames or the photo clip string. Both are diy wall art projects with no cutting, no power tools and no technique to learn first, and both can hang on the wall within an afternoon of gathering the pieces.
How do I hang wall art without damaging the walls?
Use adhesive hooks rated for the piece’s weight, or hang from picture rails and existing screws where you can. Canvas and fabric panels are so light that a single small hook holds them, which is one reason diy wall art projects suit renters so well.
How high should wall art hang?
The gallery rule is to center the art at about 57 inches from the floor — average eye level. Over a sofa, hang the bottom edge six to eight inches above the back cushions, and keep groups of diy wall art projects visually centered as one unit.
Can I mix different styles of wall art on one wall?
Yes — mixing is what makes a wall feel collected. Keep one thread running through the group, such as a shared color, similar frame finishes or repeated shapes, and even very different diy wall art projects will read as one deliberate arrangement.
How long do these projects take?
Most take between thirty minutes and one evening. The pressed flowers need ten days of pressing before their twenty minutes of framing, and macramé is the slow pleasure of the list — two or three evenings of knotting for a piece that lasts for years. That is true of most diy wall art projects here: the pleasure is in the making as much as the hanging.
Final Thoughts: Walls That Tell Your Story
A wall does not need a big budget or a decorator’s permission — it needs one honest, handmade thing to start the conversation. Choose the project whose supplies you already own, give it one evening, and hang the result before you can talk yourself out of it.
Then live with it for a week. Notice which piece guests ask about and which corner still looks quiet, and let that tell you which of these diy wall art projects comes next. Walls built this way, one handmade piece at a time, end up as the most personal in the house — and every one of these diy wall art projects can be finished by Sunday.
More from The Glossy Guide
 Home Decor
18 Cozy Winter Bedroom Ideas for Warmer Nights and Slower Mornings
A bedroom in winter has one job: be the warmest room in the house by the time the light goes.…
 Home Decor
12 Cozy Winter Living Room Ideas That Make Staying In Feel Like a Treat
A winter living room earns its keep after dark, when the lamps come on and nobody wants to leave. These…
 Fashion and Beauty
13 Winter Boots Outfits That Turn Cold Days Into Effortless Style
Winter dressing is won or lost at ground level. Pavements freeze, slush pools at crossings, and the wrong boots can…