22 Stunning DIY Shadow Box Ideas That Turn Keepsakes Into Beautiful Wall Art
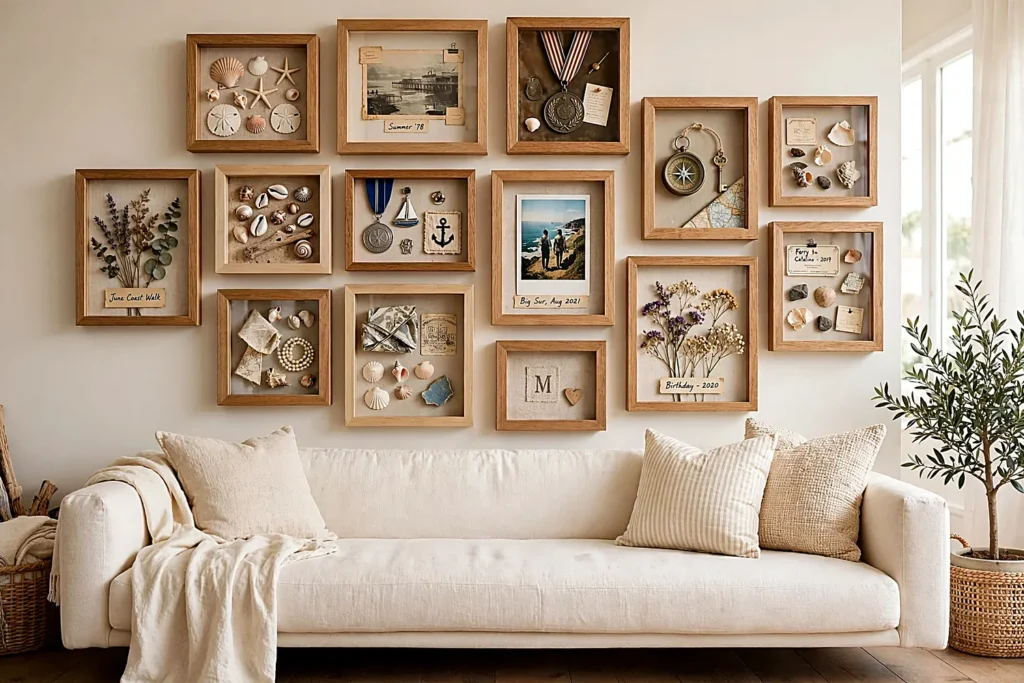
Every home has a drawer of things too precious to throw away and too awkward to display: the baby shoes, the ticket stubs, the shells from that one beach. A diy shadow box is how those things escape the drawer — arranged behind glass, given depth and light, and hung where they can be loved daily instead of remembered yearly.
The twenty-two builds below cover the whole keepsake spectrum, from a fifteen-minute shell box to a miniature room that takes a weekend. Each comes with a full materials list and honest steps, and nearly all of them start from the same readymade frame. Choose the diy shadow box your drawer has been asking for — most makers finish one and immediately start a second diy shadow box for somebody else.
Table of Contents
- Baby Keepsake Shadow Box
- Wedding Memory Shadow Box
- Travel Souvenir Shadow Box
- Seashell Beach Shadow Box
- Vintage Letter and Photo Shadow Box
- Sports Jersey Shadow Box
- Military Medal Shadow Box
- Concert Ticket Shadow Box
- Pressed Flower Shadow Box
- Fairy Light Shadow Box
- Miniature Room Shadow Box
- Book Nook Shadow Box
- Christmas Ornament Shadow Box
- Halloween Curiosity Shadow Box
- Coffee Lover’s Shadow Box
- Wine Cork Shadow Box
- Kids’ Artwork Shadow Box
- Jewelry Display Shadow Box
- Pet Memory Shadow Box
- Garden Seed Packet Shadow Box
- Action Figure Shadow Box
- Layered Paper Cut Shadow Box
- Frequently Asked Questions
- Final Thoughts: Give Your Keepsakes a Wall
Baby Keepsake Shadow Box
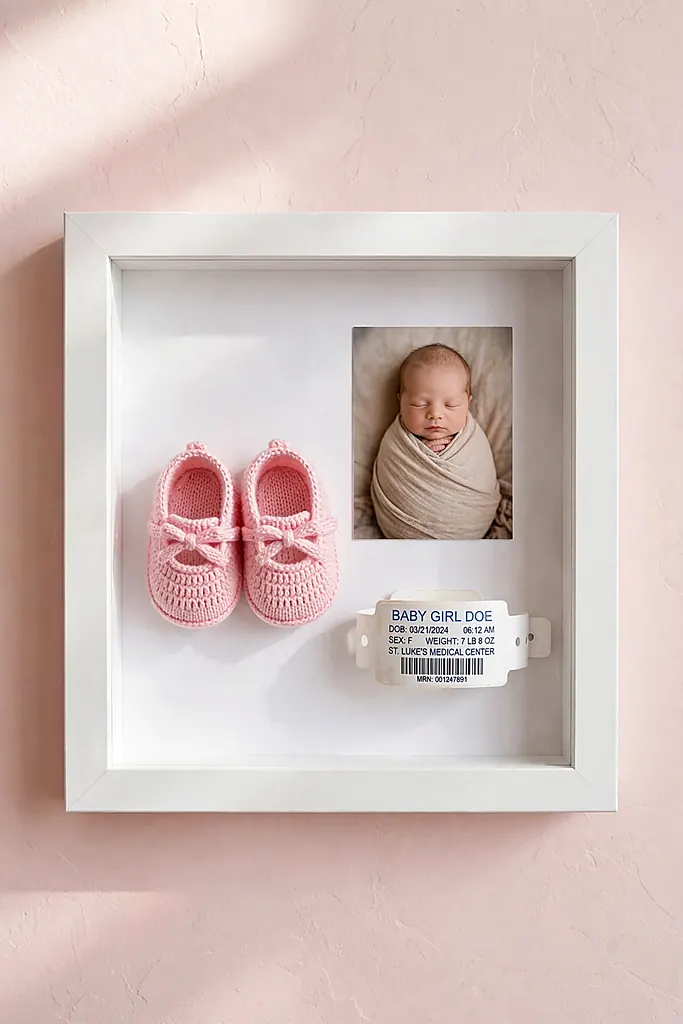
The first shoes, the hospital bracelet, the tiny hat: babyhood produces the most display-worthy clutter of any life stage, and the least storage sense. A soft-toned box gathers it all into one piece of nursery art that makes grandparents tear up on schedule.
Back it with fabric that matches the room — linen, gingham, a square of the receiving blanket if you can bear to cut it. This diy shadow box is the one most often ordered by emotion: make it once for your own wall and you will be making them as gifts for a decade. Few nursery pieces earn their wall space like a diy shadow box of firsts.
What You Need
- Shadow box frame, 25×25 cm
- Fabric or scrapbook paper for the backing
- Baby’s first shoes or booties
- A favorite newborn photo
- Hospital bracelet, first hat or a small keepsake
- Hot glue or double-sided tape
- Small pins for fabric items
How to Make It
- Cover the backing board with your fabric or paper and fix it smoothly.
- Arrange the photo first — it is the anchor — then place the shoes below it.
- Pin or glue the bracelet and small items in the gaps, balancing the corners.
- Add a tiny name-and-date label under the photo if you like.
- Close the frame, check for dust on the glass, and hang it out of direct sunlight.
A keepsake box is a perfect new-parent present — more gift thinking in these christmas gift ideas for mom.
Wedding Memory Shadow Box
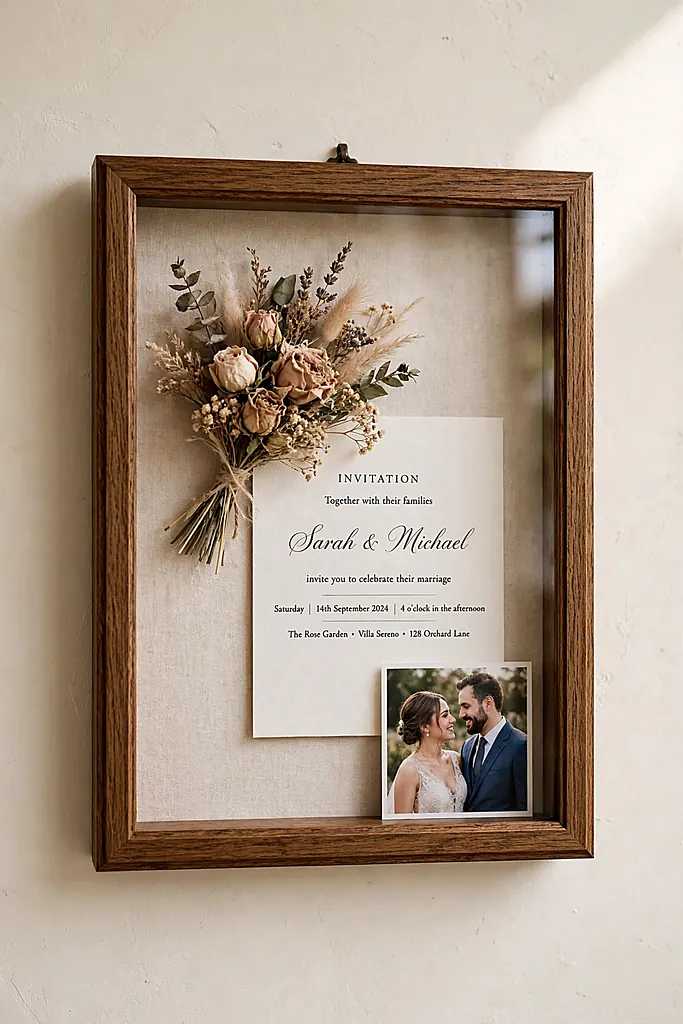
Weddings generate a small archive — the invitation, a dried boutonniere, the photo, sometimes a whole bouquet — and most of it ends up in a shoebox. Arranged in a deep frame, it becomes the most romantic picture in the house, and the only wedding photo nobody else has.
What You Need
- Deep shadow box frame, 30×30 cm
- Dried flowers from the bouquet or boutonniere
- The wedding invitation
- A favorite wedding photo
- Fabric backing in the wedding colors
- Hot glue and mounting tape
- A small label or calligraphy card
Cover the backing in the fabric and mount the invitation at an angle first, slightly overlapping one corner — formal arrangements look stiff, and a gentle overlap reads as curated rather than filed.
Build around it: photo opposite, flowers clustered along one edge, the label low. Step back before gluing anything permanent; a wedding diy shadow box deserves five minutes of rearranging. It is the most re-gifted-to-yourself project in this list. No photograph album does what a wedding diy shadow box does on a wall.
Drying note: Dry bouquet flowers in silica gel for a week before framing. Air-dried flowers keep their shape; rushed, damp ones will mold behind glass within a season.
Handmade and heartfelt beats bought — more proof in these handmade christmas gift ideas.
Travel Souvenir Shadow Box
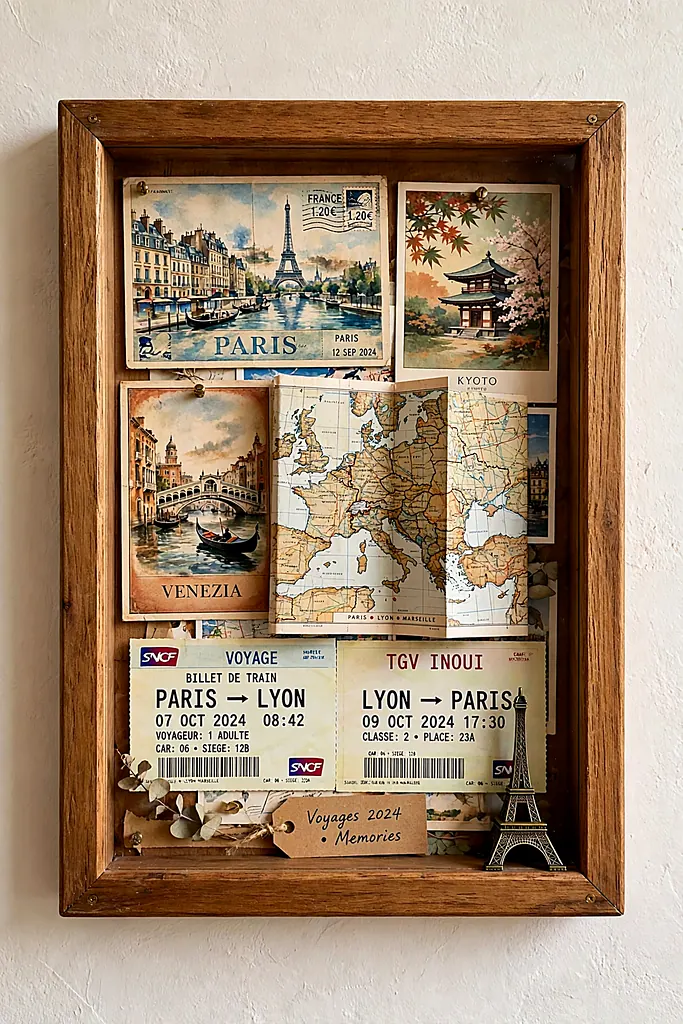
Postcards, ticket stubs, a folded map, three coins and a tiny Eiffel Tower: every trip returns with a pocketful of evidence that photographs cannot replace. One box per trip turns a hallway into an atlas of your own life, and starts more dinner conversations than any painting. It is the diy shadow box that turns one trip into a permanent exhibition.
Back it with the map of the place itself — a photocopy if the original is precious — and the whole arrangement gains instant context. A travel diy shadow box also solves the souvenir problem going forward: buy small, buy flat, it has to fit the box.
What You Need
- Shadow box frame, 30×25 cm
- A map or photocopy for the backing
- Postcards and ticket stubs from the trip
- Coins, small souvenirs, a keychain or miniature
- Mounting tape and hot glue
- A label with the place and year
How to Make It
- Fix the map to the backing, choosing the part of the map you actually traveled.
- Arrange the postcards and tickets in an overlapping fan.
- Glue the three-dimensional souvenirs in the gaps — heaviest at the bottom.
- Add the label, close the frame and check the glass for fingerprints — one diy shadow box per trip, and the hallway becomes an atlas.
At a Glance
Travel memories deserve a good entryway — set the scene with these hallway table decor looks.
Seashell Beach Shadow Box
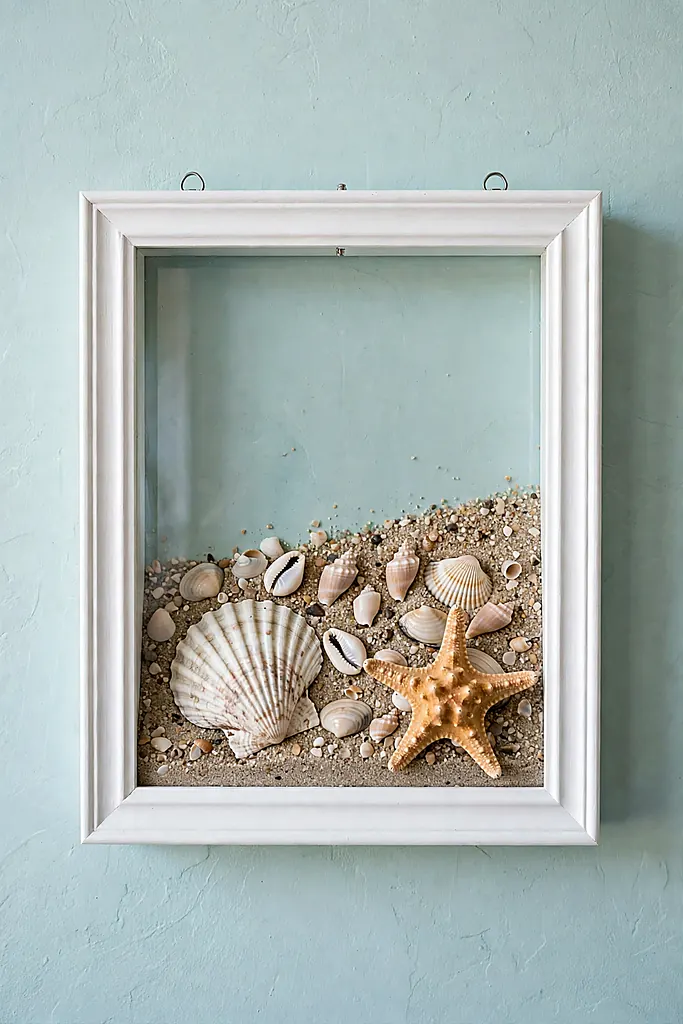
Shells come home from every beach trip and vanish into jars. In a white box, arranged by size over a whisper of the actual sand, they become coastal art with a provenance no shop can sell you — you know exactly which beach, which day, which storm had just passed. A shell diy shadow box is summer, kept.
What You Need
- White shadow box frame, 25×25 cm
- Clean, dry seashells in mixed sizes
- A starfish or sand dollar as the centerpiece
- A handful of sand from the same beach
- Card in aqua or sand color for the backing
- Hot glue
How to Make It
- Glue the colored card to the backing.
- Spread a thin, even layer of glue along the bottom and press in the sand strip.
- Arrange the shells in rows or a spiral, largest first, and glue them down.
- Set the starfish at the center or top corner as the star.
- Close the frame only when every shell is fully set — rattling shells mean a loose one — and a shell diy shadow box should never rattle.
For more display-in-glass crafting, these diy christmas snow globes are kindred spirits.
Vintage Letter and Photo Shadow Box
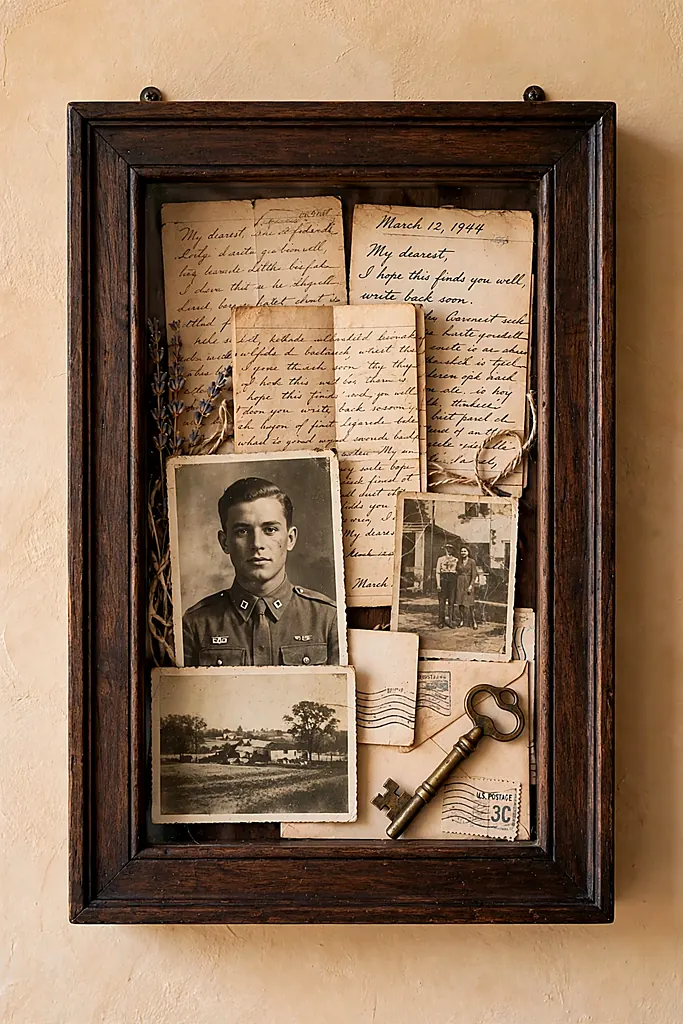
Old letters and sepia photographs are the family archive’s crown jewels, and the worst possible tenants for a cardboard box in a damp attic. Behind glass, in a dark wood frame, a grandfather’s handwriting becomes portraiture — and gets read again, which was always the point.
What You Need
- Dark wood shadow box frame
- Original letters or good photocopies
- Sepia family photographs
- A brass key, stamp or small heirloom
- Cream or kraft backing paper
- Photo-safe mounting corners
- Hot glue for the heirloom only
Use photocopies for anything irreplaceable and keep the originals in archival sleeves — sunlight through glass fades ink over years, and a copy can be reprinted when it pales. A letter diy shadow box is also a rescue mission.
Arrange the letters slightly fanned so the handwriting shows, the photograph overlapping one corner, the key or stamp low as a full stop. This diy shadow box suits a study or hallway, anywhere the light is gentle.
Label the back of the frame with names and dates while the knowledge is alive. Future family historians will bless you; the front is for looking, the back is for remembering.
Paper keepsakes are wall art with a story — see these diy wall art projects for more.
Sports Jersey Shadow Box
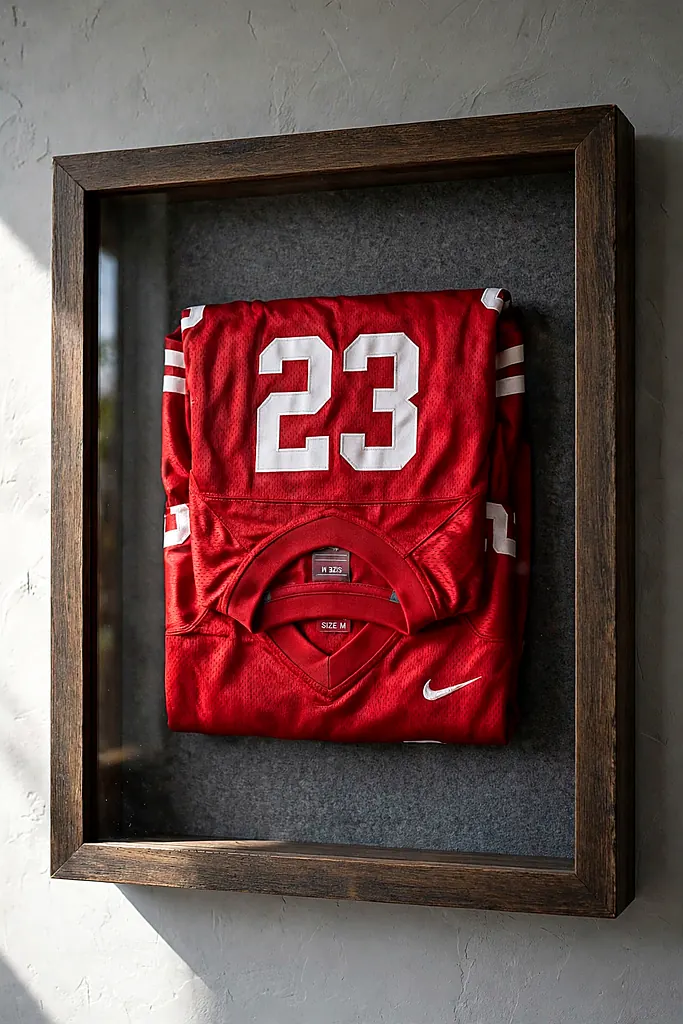
A signed jersey, a championship shirt, the number your kid wore for three seasons: sport’s most emotional garment deserves better than a drawer. The deep jersey frame is the largest box here and the most proudly hung — dens and hallways are its natural habitat. It is the diy shadow box a fan’s home is judged by.
Fold or drape the jersey over a foam board cut to the frame, pinning from behind so no pins show. A jersey diy shadow box also protects the fabric from the dust and light that quietly ruin the drawer-kept ones.
What You Need
- Deep jersey shadow box frame, about 60×80 cm
- Foam board insert cut to size
- The jersey, washed and pressed
- Straight pins and mounting tape
- A photo or ticket from the big game (optional)
- Black or team-color backing fabric
Cover the foam board with the backing fabric. Lay the jersey over it, centering the number, and fold the sides and sleeves back neatly, pinning everything from behind the board. Measure the frame against the jersey laid flat before you order it — a diy shadow box must fit the shoulders.
Add the photo or ticket in a lower corner if you have one — context turns a shirt into a story. Slide the board into the frame, close it, and hang it on fixings rated for its weight; this is the heaviest build in the list.
Game-day pride pairs with party food — plan the spread with these friendsmas party ideas.
Military Medal Shadow Box
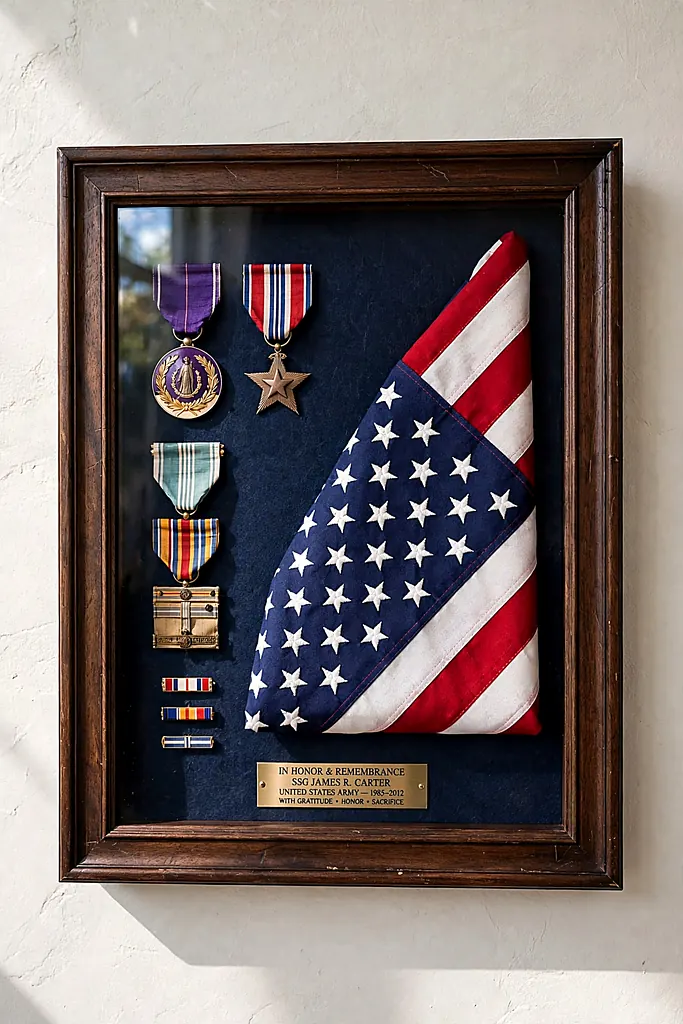
Service medals and a folded flag carry a family’s pride and its sacrifices in the smallest possible space. A respectful, well-ordered box — dark wood, deep matting, everything aligned — is the traditional way to honor them, and making it yourself adds the one ingredient shops cannot: care.
What You Need
- Dark wood shadow box with deep matting
- Service medals and ribbons
- A folded flag or a service photograph
- Velvet or felt backing in navy or black
- Small pins and mounting tape
- An engraved or printed name plate
How to Make It
- Cover the backing with velvet or felt and plan the layout on a table first — order matters here.
- Place the flag or photograph as the anchor piece.
- Pin the medals in service order, perfectly aligned; use a ruler, this is not the box for jaunty angles.
- Fix the name plate centered at the bottom, close the frame, and hang it in a place of honor. A medal diy shadow box is a family’s flag in miniature.
At a Glance
Heritage pieces anchor a room — more in these vintage home decor ideas.
Concert Ticket Shadow Box
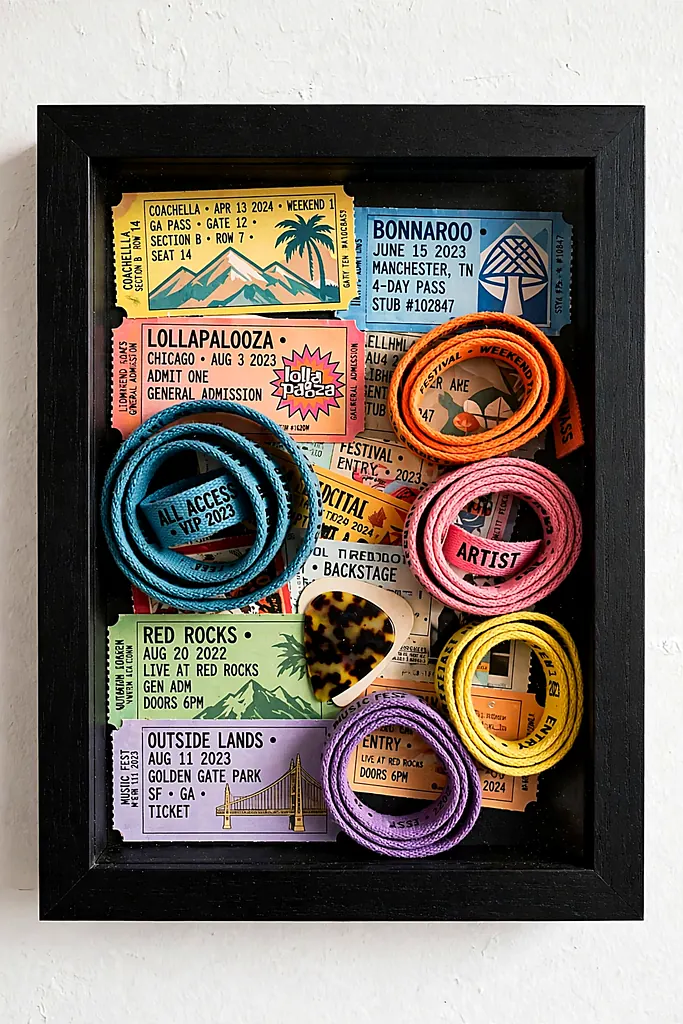
A decade of gigs fits in one black frame: ticket stubs in a riot of colors, festival wristbands, a guitar pick caught from the stage. It is the music lover’s autobiography, and it grows with every show — leave a corner empty on purpose, as a promise to your future self.
Arrange chronologically and the box becomes a timeline; arrange by color and it becomes art. Either way, this diy shadow box is the fastest here to make and the hardest to walk past without stopping.
What You Need
- Black shadow box frame, 30×30 cm
- Concert ticket stubs
- Festival wristbands
- A guitar pick, setlist or small souvenir
- Black backing card
- Mounting tape and hot glue
How to Make It
- Sort the stubs — by date for a timeline, by color for art.
- Tape the stubs in overlapping rows on the backing card.
- Glue the wristbands in a coil or fan in one section.
- Add the pick or souvenir as the centerpiece.
- Close the frame, leaving your planned empty corner for the next show — this diy shadow box is officially a work in progress.
Stub saver: Photograph every ticket before framing it. Inks fade over years, and the photo backup keeps the full story — date, seat and price — readable forever.
Music memories and party nights go together — bring both to these bring a board night ideas.
Pressed Flower Shadow Box
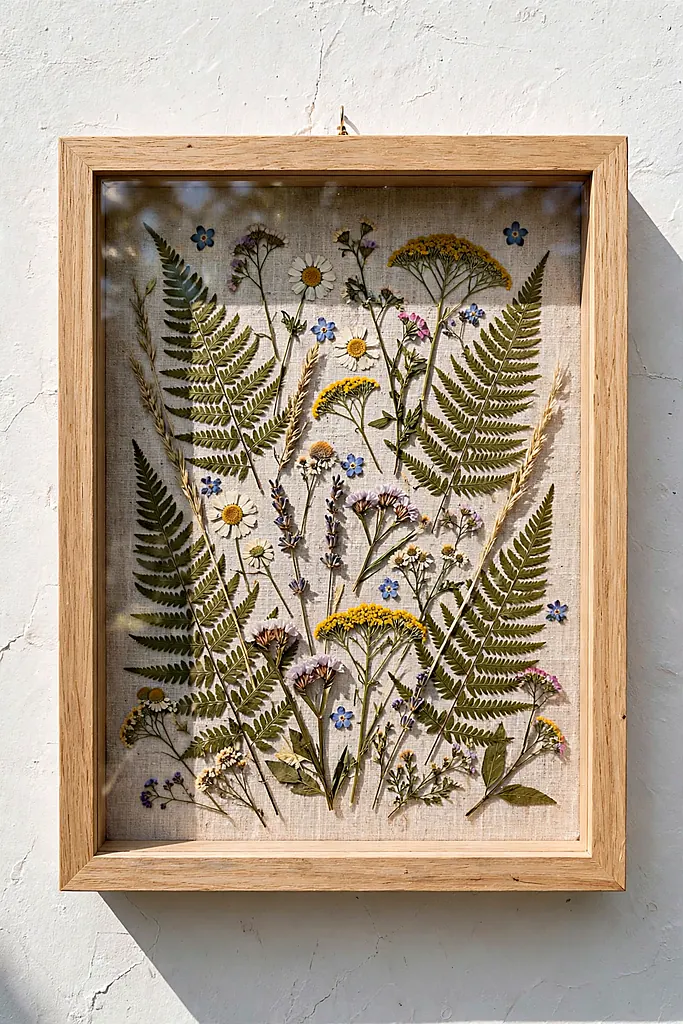
Pressed wildflowers on linen, in a pale wood frame: the quietest box in the list and often the prettiest. Garden clippings, a wedding bouquet’s second life, or the flowers from a particular walk — pressed flat and arranged like a botanist’s plate, they keep a season alive on the wall for years.
What You Need
- Light wood shadow box frame
- Pressed flowers and ferns, fully dry
- Linen or watercolor paper for the backing
- Tweezers
- Tiny dots of clear glue
- Labels with flower names (optional)
Press flowers for at least two weeks between book pages with weight on top; any moisture left will brown them behind glass. Handle the dried pieces with tweezers — fingers crush what books preserved. A flower diy shadow box is a garden that never needs watering.
Arrange on the linen before gluing: a formal grid reads botanical, a loose scatter reads meadow. Fix each piece with the smallest possible glue dot. A botanical diy shadow box fades gracefully if hung away from direct sun, keeping its colors for years.
Botanical calm suits bedrooms — carry it further with these winter bedroom decor ideas.
Fairy Light Shadow Box
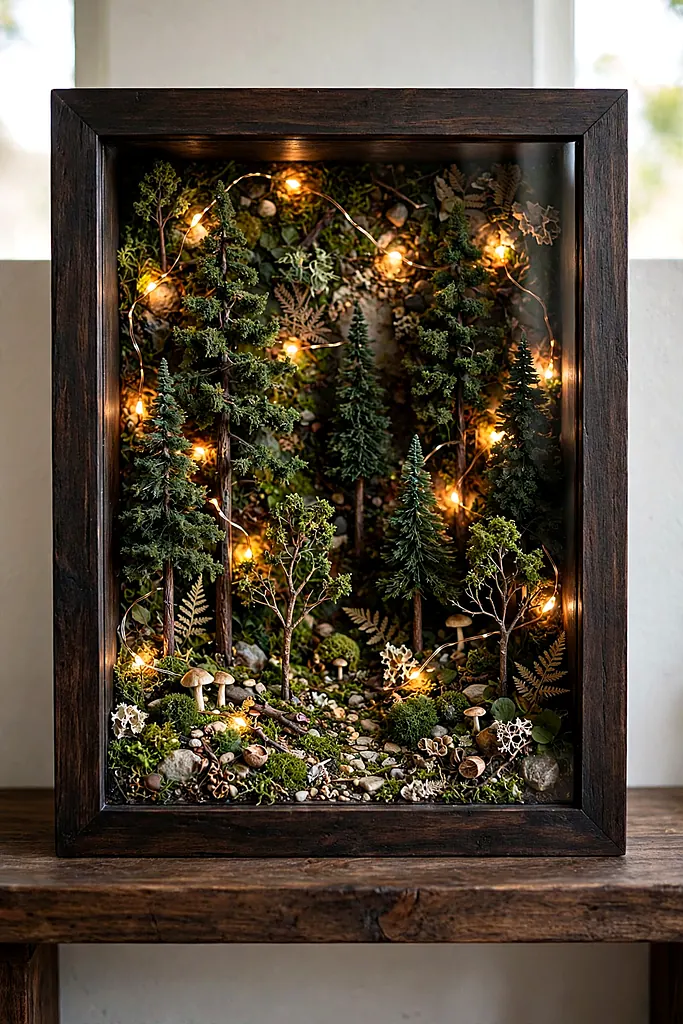
A deep box, a miniature scene, and a string of warm micro-lights: by day it is a curiosity, by night it is a lantern with a story inside. Tiny trees and a cottage, a starlit beach, a miniature street — the scene is yours; the glow is what makes strangers lean in.
Use battery micro-LEDs on copper wire; the battery pack hides behind the backing with the switch reachable at the frame’s edge. This diy shadow box is the one children will claim as a nightlight, so make the switch easy for small hands.
What You Need
- Deep shadow box frame, at least 8 cm deep
- Miniature scene pieces — trees, cottage, figures
- Battery micro-LED string lights
- Painted backing (night sky or landscape)
- Hot glue
- Foam scraps for terrain levels
Paint or paper the backing first, then build the scene in layers on foam levels — depth is what separates a diorama from a shelf. Glue the tallest pieces at the back.
Weave the light string through the scene last, hiding the wire behind pieces and tucking a few bulbs forward as stars or windows. Mount the battery pack behind the backing with its switch at the edge. It is the diy shadow box children request as a nightlight by name.
At a Glance
Evening glow is a whole decorating mood — see these christmas living room decorations.
Miniature Room Shadow Box
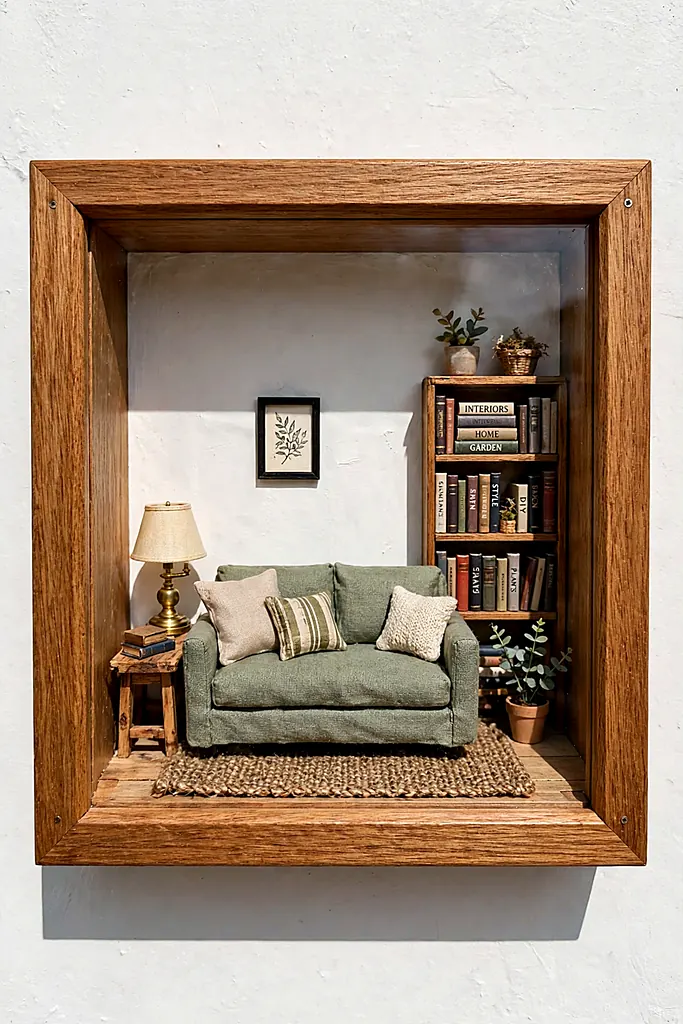
An entire tiny living room — sofa, lamp, bookshelf, a rug the size of a stamp — built inside a deep frame. It is the most ambitious box here and the most absorbing: part dollhouse, part sculpture, and the single best conversation piece a hallway can hold. Visitors will crouch. They always crouch. No other diy shadow box earns that reaction so reliably.
What You Need
- Deep shadow box frame, 10 cm or deeper
- Miniature furniture set (1:12 scale)
- Tiny books, lamp and accessories
- Wallpaper and flooring paper for the interior
- Hot glue and tweezers
- A miniature rug or fabric scrap
How to Make It
- Line the inside back and floor with wallpaper and flooring paper.
- Build or buy the furniture and paint any pieces that need unifying.
- Arrange the room on the table first — sofa as anchor, bookshelf opposite, lamp in the corner.
- Glue the back row first, working forward, using tweezers for the small pieces.
- Add the tiny books and accessories last; they are the life of the room.
- Close the frame and hang it at eye level — crouching visitors deserve a fair view.
A tiny perfect living room deserves a full-size one to match — ideas in these cozy winter living room decor ideas.
Book Nook Shadow Box
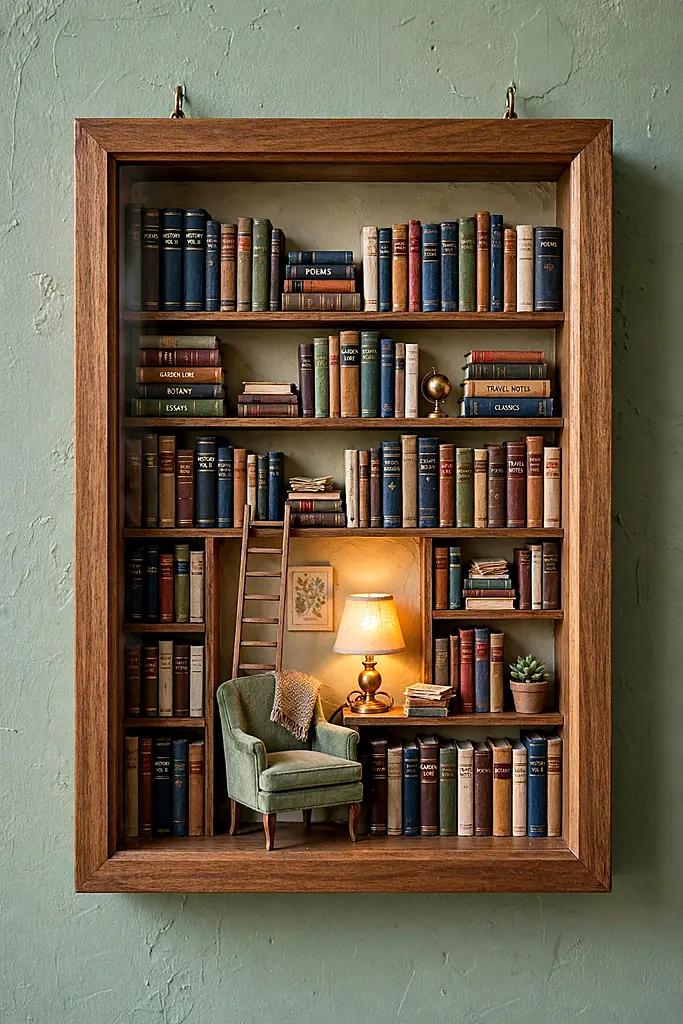
The reader’s version: miniature books by the dozen, a tiny armchair, a lamp’s warm pool of light — a library the size of a shoebox, hung beside the real reading chair. Unlike shelf book-nooks, the framed version hangs on the wall and catches the light like a window into a smaller, quieter world. It is the diy shadow box readers build for the chair they read in.
Tiny books are easy to make from folded card with printed or hand-lettered spines, and their slight irregularity is what makes the shelves look loved. A bookish diy shadow box also makes the definitive gift for the reader who has everything except wall space in a library.
What You Need
- Deep shadow box frame
- Miniature books (bought or folded from card)
- A tiny armchair or reading chair
- Miniature lamp or LED tealight
- Shelf strips of balsa wood
- Hot glue and tweezers
How to Make It
- Fit the balsa shelves across the inside back of the frame.
- Glue the armchair low in one corner and the lamp beside it.
- Fill the shelves with books, leaning a few at angles for realism.
- Close the frame and hang it near your real reading chair.
Small handcrafts, long evenings — these crochet patterns for beginners are the reader’s other hobby.
Christmas Ornament Shadow Box
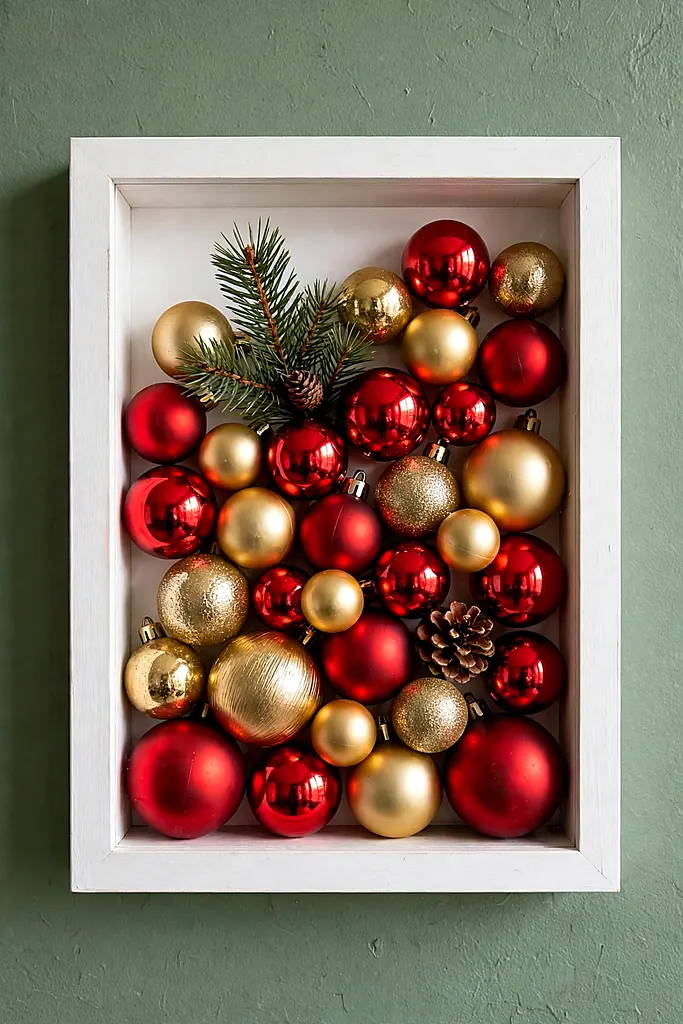
Baubles too pretty — or too fragile — for the tree get a safer stage: a white box filled with red and gold ornaments around a sprig of pine. It hangs where a wreath would, survives toddlers and cats, and packs away in January without a single breakage report. A bauble diy shadow box also ends the annual breakage report for good.
What You Need
- White shadow box frame
- Red and gold baubles in mixed sizes
- A sprig of real or faux pine
- White or deep green backing
- Hot glue
- A small ribbon bow
Arrange the baubles largest-first, letting them nestle rather than line up; a filled-to-the-glass look is the goal, so keep adding until nothing can shift when the frame tilts.
Tuck the pine sprig along one edge and the bow in a corner. Ornament boxes are also the elegant solution for the one irreplaceable bauble — give it the whole box, a label, and a place of honor. A festive diy shadow box stores flat and returns each December in ten seconds.
Fragile favorite: The bauble from the year dot deserves its own small box. Solo, labeled and lit by the room, it stops being an ornament and becomes an heirloom on display.
Ornaments off the tree pair with ornaments on the door — see these diy christmas wreath ideas.
Halloween Curiosity Shadow Box
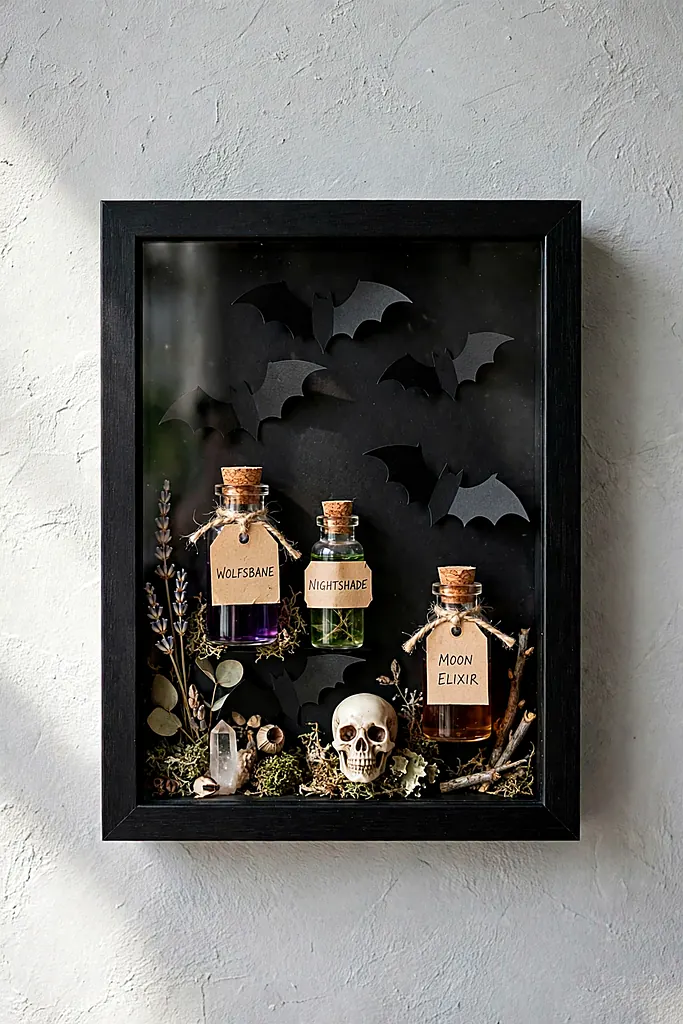
For the October-hearted: a black box of small curiosities — miniature potion bottles, a tiny skull, paper bats mid-flight, a key to nothing. It delivers Halloween’s mood in one square foot, which is exactly right for small homes and offices that cannot commit to a full haunted house. It is the diy shadow box with the smallest footprint and the biggest mood.
Build it on black backing with the bottles on a little shelf strip, and let one element — the skull, a raven — be the star. A curiosity diy shadow box packs away with the decorations and returns each October like a favorite ghost.
What You Need
- Black shadow box frame
- Miniature potion bottles
- A small decorative skull or raven
- Paper bats or a tiny garland
- Black backing card
- Balsa shelf strip
- Hot glue
How to Make It
- Fix the black card to the backing and glue the shelf strip across the middle.
- Set the bottles on the shelf in a row of odd numbers.
- Place the skull as the star below the shelf.
- Glue the paper bats in a flight path across the top corner.
- Close the frame and hang it where its shadows can be appreciated.
At a Glance
October decorating in full lives in these enchanting halloween decor ideas.
Coffee Lover’s Shadow Box
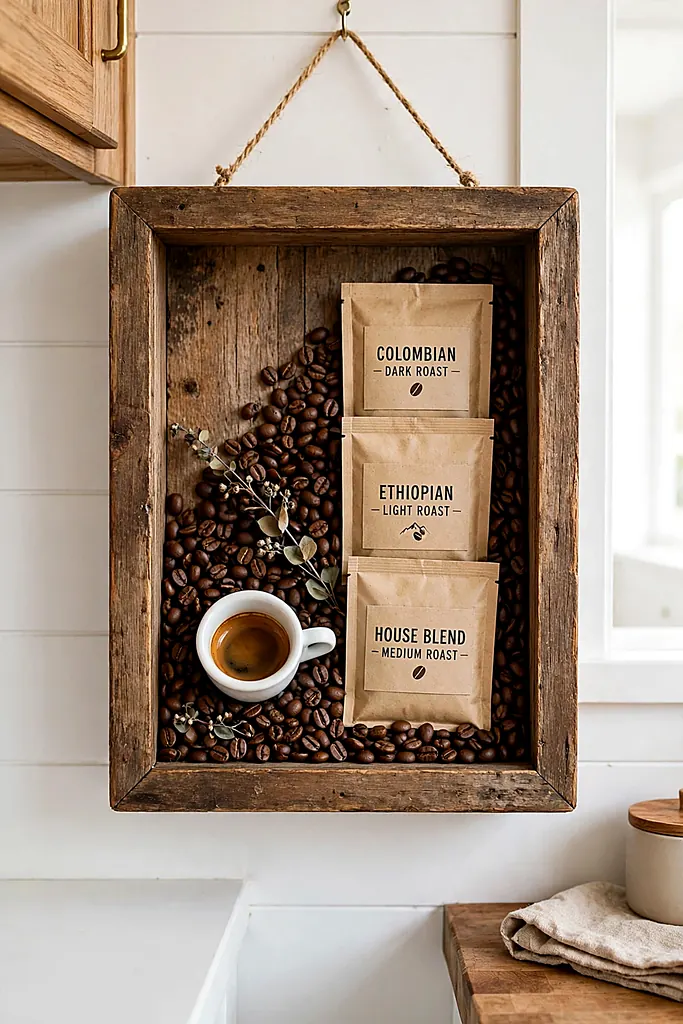
For the kitchen wall of the devoted: coffee beans in a swirling layer, a tiny espresso cup, sachets from beloved cafés, maybe the spoon from a honeymoon café in Naples. It smells faintly wonderful every time the kitchen warms up, which no other picture in the house can claim.
What You Need
- Rustic wood shadow box frame
- Coffee beans, about 2 cups
- A miniature espresso cup
- Café sachets, a menu card or beans’ origin labels
- Burlap or kraft backing
- Hot glue
How to Make It
- Fix the burlap backing.
- Glue the beans in a dense layer across the lower two-thirds — a swirl pattern hides gaps best.
- Mount the cup at an angle in the upper corner, as if mid-serve.
- Add the sachets or labels along the top edge.
- Close the frame and hang it near the coffee station, where it belongs — this diy shadow box is the kitchen’s morning greeter.
Scent trick: Whole beans keep a whisper of coffee scent for months behind glass. Refresh an old box by swapping in fresh beans — five minutes, and the kitchen smells new again.
Coffee demands cake — pair the wall with these pecan pie cake recipes.
Wine Cork Shadow Box
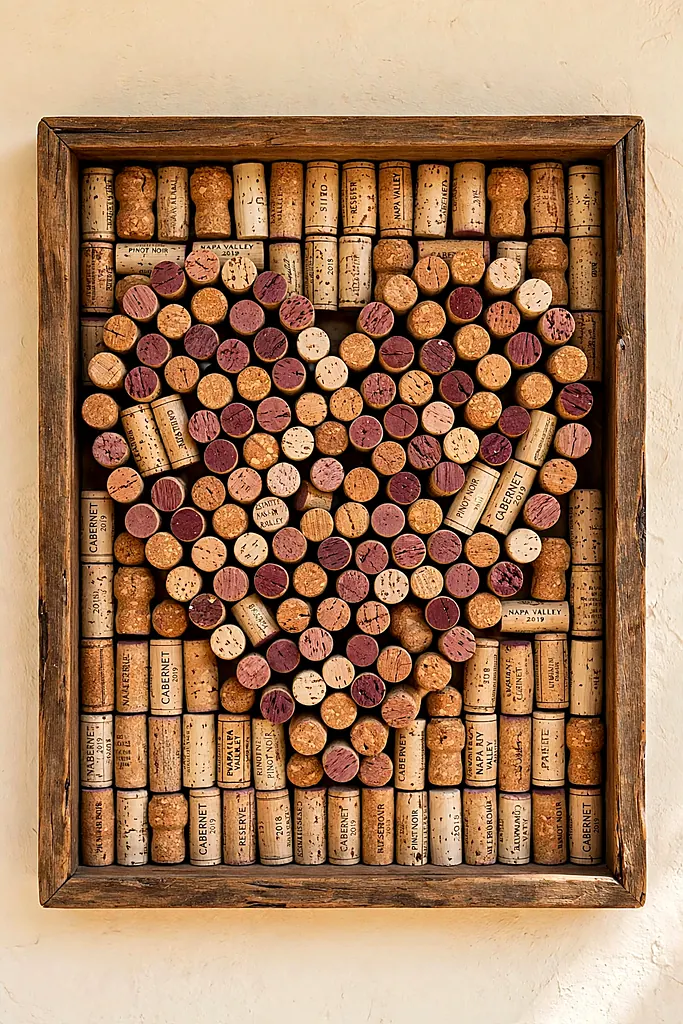
Every opened bottle leaves a cork, and every cork is a small wooden memory of an evening. Collected in a deep frame — arranged in a heart, a monogram, or honest rows — they become the dining room’s most personal artwork, and the collection gives every future bottle a tiny sense of occasion.
Buy a frame with a slot in the top and the collection keeps growing without ever opening the glass: the box becomes a ritual object, fed by birthdays and anniversaries. Corks from ordinary Tuesdays count too — arguably they count most. No diy shadow box tells more stories per square inch.
Arrange the printed corks facing out in the front layer; the plain ones fill behind them. A cork diy shadow box is also the rare artwork your dinner guests literally contributed to.
What You Need
- Deep shadow box frame (top-slot style if you can find one)
- Wine corks — 80 or more for a full box
- Hot glue for the arranged layers
- A heart or monogram template (optional)
- Dark backing to make the corks glow
Lay the design on the table first if you are making a heart or monogram — corks are unforgiving to rearrange once glued. Photograph the layout before touching the glue.
Glue the front layer with printed sides out, then drop or stack the remaining corks behind it. If your frame has a top slot, the back layer can stay loose and keep growing for years. A cork diy shadow box grows a little more meaningful with every celebration.
From the drinks cabinet to the drinks table — mix these non-alcoholic thanksgiving punch recipes for the drivers.
Kids’ Artwork Shadow Box
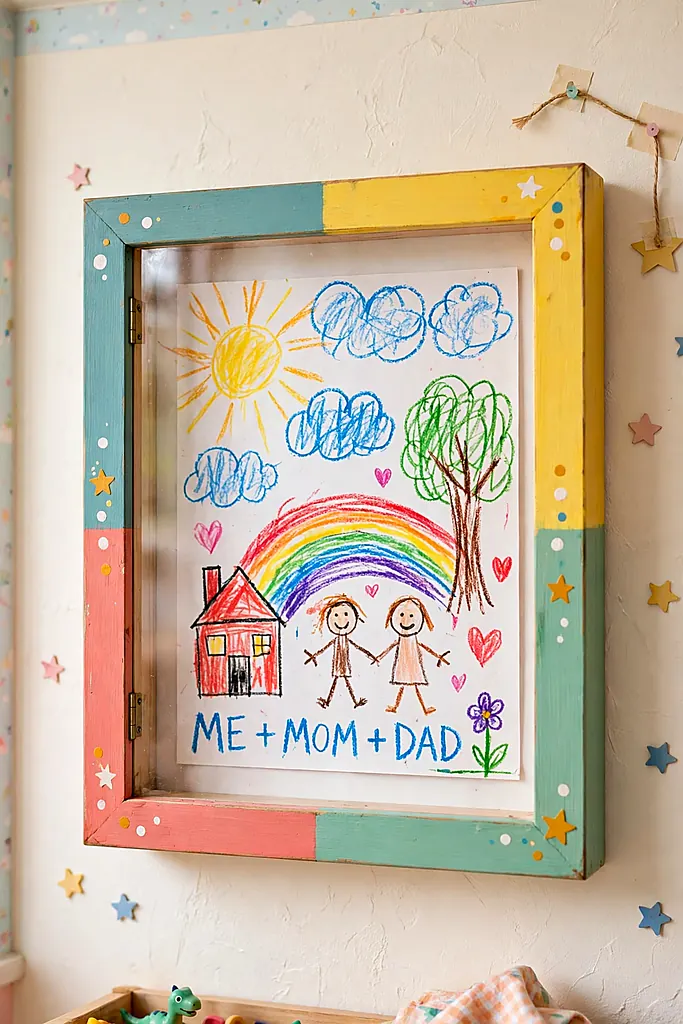
Children produce masterpieces at industrial rates, and the fridge door holds four. A front-opening shadow box is the rotating gallery: this week’s drawing in the frame, last month’s filed safely behind it inside the same box. The artist feels famous; the hallway stays calm; everybody wins. A rotating diy shadow box turns fridge art into gallery art.
What You Need
- Front-opening shadow box frame
- The child’s current masterpiece
- Backing in a gallery white or the child’s favorite color
- A small name-plate label (‘The Artist, Age 6’)
- Wall fixings at grown-up eye level, not child height
Choose the front-opening frame — it swaps artwork in seconds without coming off the wall, which is the entire point. Keep the stored stack inside flat and dry.
Hang it at adult eye level in a shared space, not in the child’s room: a gallery is about audience. Change the piece with ceremony — new exhibitions deserve an unveiling, however small. This diy shadow box quietly teaches a child that their work is worth framing.
At a Glance
Kids’ creativity belongs on every wall — more family-friendly makes in these halloween cookie recipes.
Jewelry Display Shadow Box
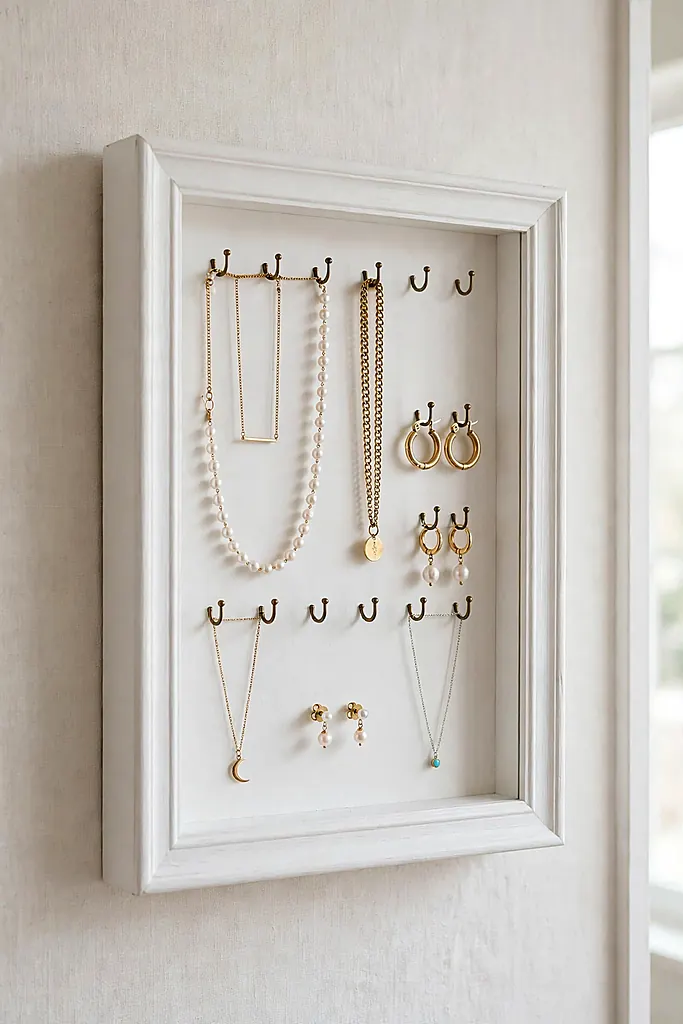
Necklaces tangle in drawers and disappear in boxes; on hooks inside a glass-fronted box, they hang untangled, visible, and pretty enough to count as the dressing room’s art. Choosing jewelry becomes looking at a picture you rearrange as often as you like. As storage, a jewelry diy shadow box is unbeatable; as decor, it is better.
Line the backing with velvet or linen so pieces read clearly, and space the hooks wider than feels necessary — jewelry displays breathe or they look like storage. A display diy shadow box also travels well through life: the whole collection lifts off the wall in one piece on moving day.
What You Need
- Shadow box frame with a hinged or removable front
- Small brass hooks or pegs
- Velvet or linen for the backing
- Your necklaces, bracelets and earrings
- Hot glue and small screws
- A mirror tile at the base (optional)
How to Make It
- Cover the backing with velvet or linen.
- Screw or glue the hooks in rows, spaced generously.
- Hang the longest necklaces first, then fill with shorter pieces and earrings.
- Add the mirror tile at the base if you like the boutique effect.
- Close the front and hang it where you dress.
Tangle math: One hook per necklace, no exceptions and no sharing. The day two necklaces share a hook is the day the drawer-tangle moves into your beautiful box.
Jewelry is an accessory story — complete the look with these scarf outfits.
Pet Memory Shadow Box
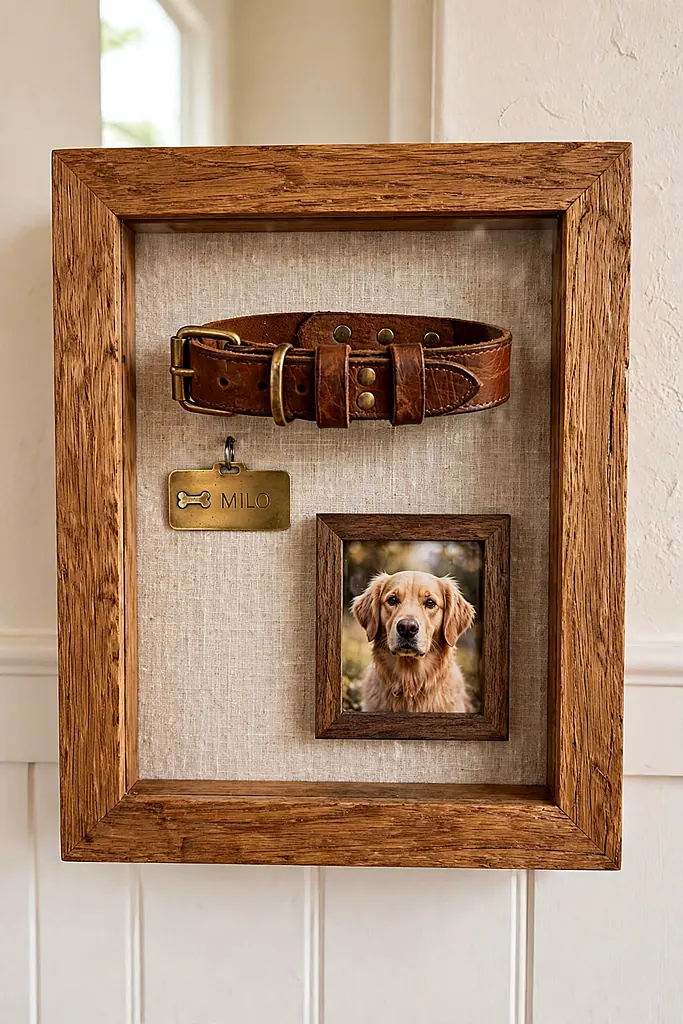
A collar, a tag that still jingles faintly in memory, the photograph where they are mid-zoom: a pet’s box is the most emotional build here, and for many makers the most necessary. It gives grief and gratitude a place to live that is not a shoebox in a closet. It is the diy shadow box makers describe as hard to build and impossible to regret.
What You Need
- Warm wood shadow box frame
- The pet’s collar and tag
- A favorite photograph
- A paw-print card or a small toy
- Soft neutral backing fabric
- Mounting tape and small pins
How to Make It
- Cover the backing with the fabric.
- Mount the photograph first — the face is the anchor of the whole box.
- Arrange the collar in a gentle arc below the photo and pin it softly.
- Add the paw print or toy in a corner.
- Close the frame and hang it somewhere you pass daily, where it can do its quiet work.
Gentle timing: There is no right week to make this box. Some makers build it the month they say goodbye; others wait a year. Both are correct — the box waits patiently for you.
A home full of loved things is the goal — browse these christmas decor ideas for more warmth.
Garden Seed Packet Shadow Box
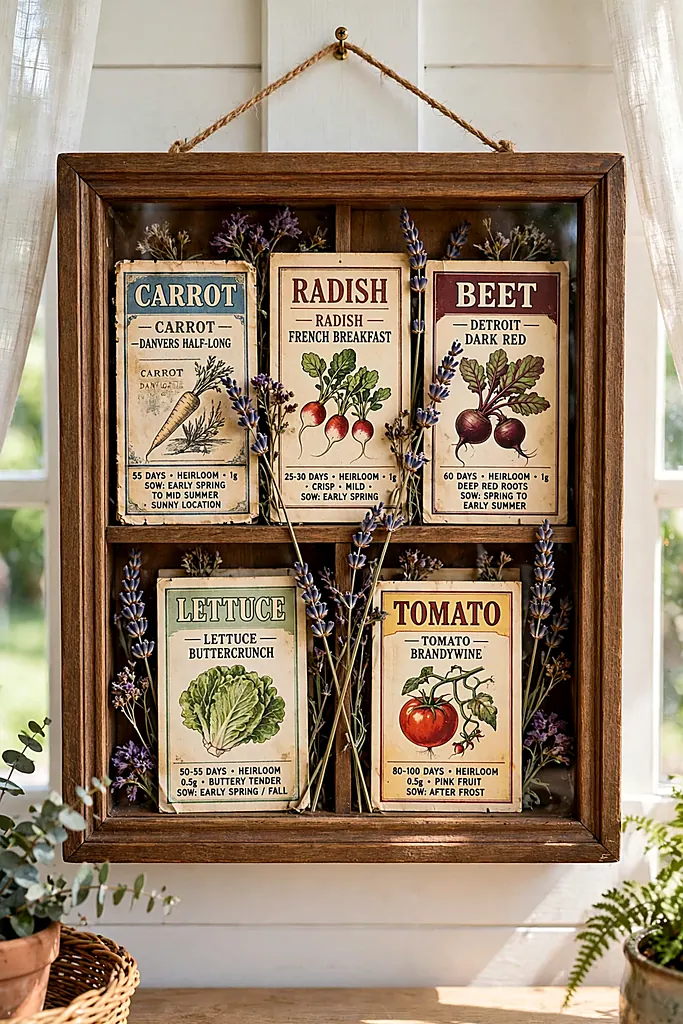
Vintage seed packets are miniature posters — hand-lettered, brightly painted, far too pretty for the potting shed. In a frame, arranged in a grid with dried lavender between them, they become the sunroom’s or kitchen’s most cheerful picture, and a promise of next season on the wall all winter.
Original packets from your own garden years are the treasures; reproductions fill gaps without shame. A gardener’s diy shadow box also makes a deeply personal gift — especially with a packet of seeds tucked behind the glass for spring.
What You Need
- Shadow box frame, size to your packet count
- Vintage or reproduction seed packets
- Dried lavender or herb sprigs
- Kraft or sage backing paper
- Mounting tape
- A tiny garden label (‘Next Year’s Plans’)
Arrange the packets in a neat grid with even gaps — this is the most graphic box in the list, and precision is its charm. Tape them from behind so the fronts stay pristine.
Tuck the dried sprigs vertically between columns and fix the little label at the bottom. Hang it where winter light reaches it; seed packets are optimism, framed. A seed-packet diy shadow box is next spring, framed in winter.
Real seeds rule: If you tuck a seed packet behind the glass as a gift, write the sowing date on it. Seeds keep a year in a frame — after that they are memorabilia.
Garden planning pairs with garden eating — see these healthy thanksgiving side dishes.
Action Figure Shadow Box
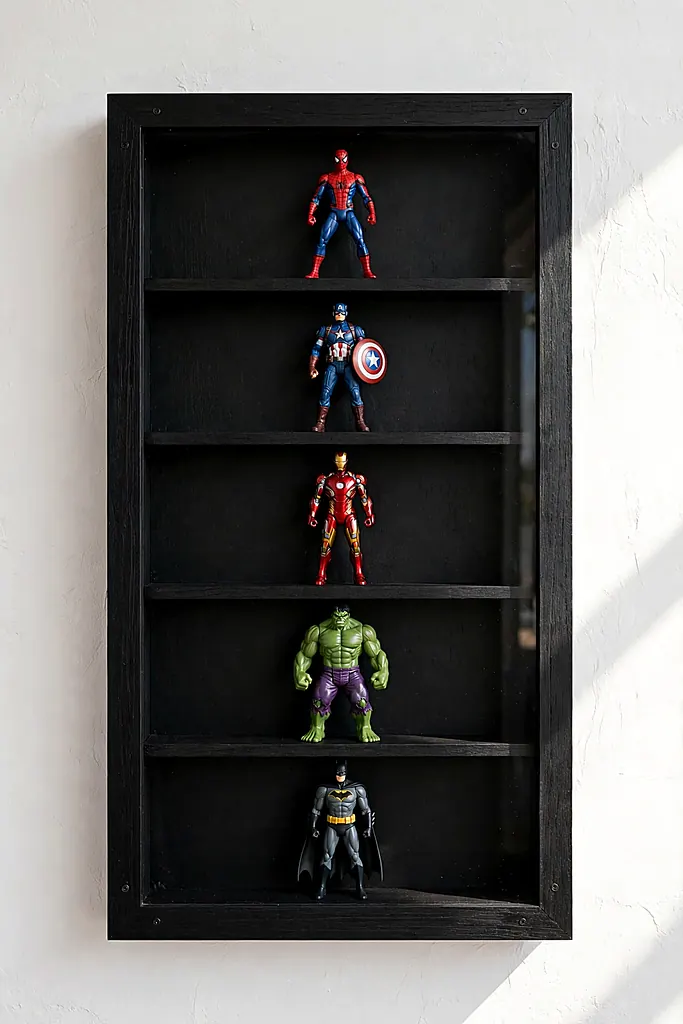
Collectors know: figures in a storage bin are inventory, figures behind glass are a gallery. Small shelves inside a deep black box turn a row of heroes into a museum case — dust-free, dramatic, and safe from both sunlight and visiting toddlers’ archaeological ambitions. It is the diy shadow box that turns a collection into a gallery.
What You Need
- Deep black shadow box frame
- Action figures or collectibles (4–8 per box)
- Balsa strips for internal shelves
- Black backing
- Museum putty for feet
- LED strip light (optional, for drama)
How to Make It
- Fit the balsa shelves across the inside, sized to your tallest figure.
- Set the figures on the shelves, heroes in front, and fix their feet with museum putty.
- Add the LED strip along the top inside edge if you want the full gallery drama.
- Close the frame and hang it out of direct sunlight, which fades paint and capes alike.
Another display craft with hidden depths — these diy sunburst mirror ideas catch light the same way.
Layered Paper Cut Shadow Box
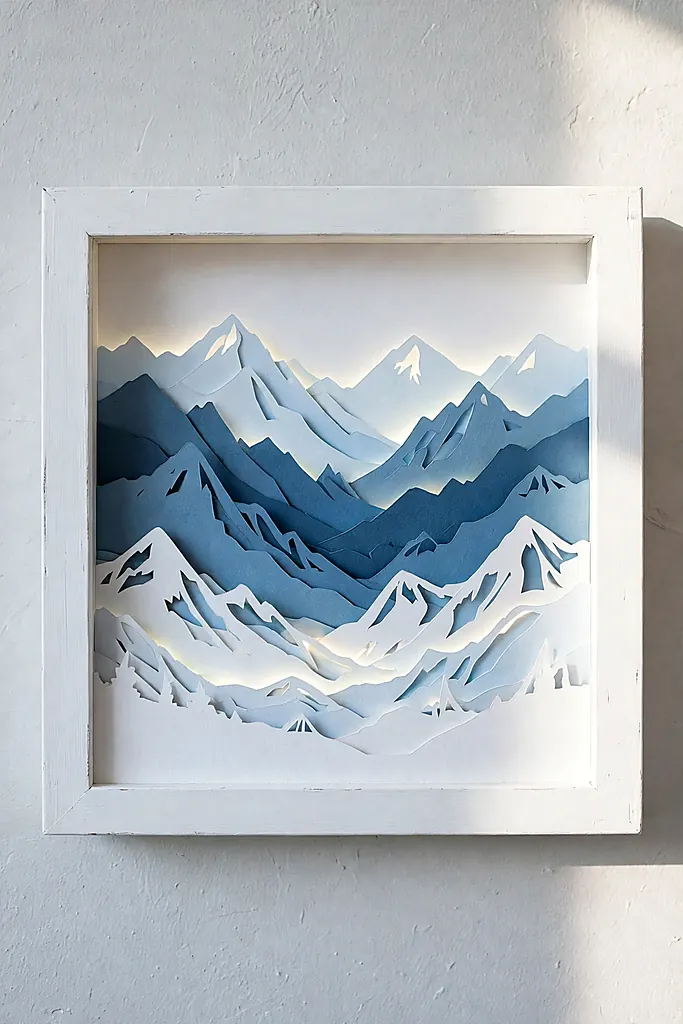
The most artistic build here: five to eight layers of cut paper — mountains behind mountains, a forest, a moon — spaced in a deep frame so shadows between the layers create real depth. Backlit gently, it glows like a window into a paper world; unlit, it is still the cleverest picture on the wall.
Cut the layers from a template or draw your own ridgelines, keeping each layer simpler than the one in front. A paper diy shadow box costs almost nothing and looks like it cost a gallery fee. Foam spacers between layers do the magic — half a centimeter of air is what turns flat paper into landscape.
What You Need
- Deep shadow box frame, 5 cm or deeper
- Cardstock in graduated shades (white to deep blue works beautifully)
- Craft knife and cutting mat
- Foam adhesive spacers
- A printed template or your own drawn ridgelines
- LED strip or fairy lights for backlighting (optional)
Cut the back layer first — the simplest silhouette, usually sky with a moon or sun — and work forward, adding detail: ridges, then trees, then foreground grass or waves.
Stack the layers with foam spacers at the edges, test the depth against the frame before fixing, and add the light strip behind the back layer if you are backlighting. This final diy shadow box rewards patience over everything; give it an evening and no interruptions.
Spacer secret: Hide the foam spacers behind the silhouettes’ edges, never in open sky. A visible spacer breaks the illusion; a hidden one just deepens it, literally.
Layered winter scenes echo the season — see these flocked tree decorating ideas.
Frequently Asked Questions
What size frame works best for a diy shadow box?
The 25×25 cm and 30×30 cm sizes suit most keepsakes; jerseys and flags need the big 60×80 cm deep frames. Depth matters more than width — 5 cm suits flat pieces like tickets and photos, while ornaments, shells and miniatures want 8–10 cm.
Can I make a shadow box without buying a frame?
You can build a box from a deep picture frame plus balsa strips, or from a wooden crate fronted with acrylic. But readymade frames are cheap and square, which is why most makers — and most builds in this list — start from one. For a first diy shadow box, start at 25 by 25 centimeters and go deep rather than wide.
How do I keep items from sliding inside the box?
Fix everything: hot glue for hard pieces, pins for fabric, mounting tape for paper, museum putty for anything valuable you may want back. A diy shadow box should survive being carried to another room without a single rattle.
How do I keep dust out?
Seal the frame’s back edges with tape after closing, and hang boxes away from kitchen grease and bathroom steam. A quick pass with a microfiber cloth on the glass weekly keeps a diy shadow box looking gallery-fresh.
What should I put in my first shadow box?
Start with the box your drawer votes for: tickets, shells or one sentimental cluster. The fifteen-minute builds teach the whole craft — backing, arranging, fixing, closing — and the first diy shadow box reliably starts a collection.
Can a shadow box be a good gift?
It is one of the most personal gifts there is — a baby keepsake for new parents, a wedding box for a first anniversary, a cork box for the couple whose evenings fill it. A handmade diy shadow box is remembered long after the wrapping paper is forgotten. A diy shadow box says you kept the evidence of someone’s happiest days.
Final Thoughts: Give Your Keepsakes a Wall
Twenty-two boxes, and every one of them began as a drawer nobody wanted to open. That is the real craft here: not the gluing, but the rescuing — giving the ticket stub, the collar, the first shoe a frame, a wall, and an audience. Your keepsakes were never clutter. They were a collection waiting for its gallery.
Start with one box this weekend — the one your drawer votes for — and hang it where you will pass it daily. Then notice how the room changes: it has a story on the wall now, and it is yours. That is what a diy shadow box does that no bought picture can. And when guests ask about it, as they will, you will understand that every diy shadow box is really an invitation to tell the story it keeps.
More from The Glossy Guide
 DIY & Craft
13 DIY Sunburst Mirror Ideas That Make a Wall Look Expensive
A sunburst mirror is the hardest-working decoration a wall can wear: it bounces light, fakes a window, and turns a…
 DIY & Craft
16 DIY Christmas Wreath Ideas to Make Your Front Door the Best on the Street
A wreath is the handshake of a house in December — the first thing guests see and the thing the…
 DIY & Craft
14 DIY Wall Art Projects That Turn Blank Walls Into the Best Part of the Room
Blank walls make even a furnished room feel unfinished, and the fix does not need a gallery budget. These diy…