24 Stunning Salt Dough Christmas Ornaments That Look Store-Bought

Every December, the best ornaments on the tree are the ones nobody bought. Salt dough — flour, salt and water — turns an ordinary afternoon into a box of keepsakes, and these salt dough christmas ornaments cost pennies each while looking like they came from a craft fair. Grandparents cry over the handprints. Children negotiate over the glitter.
Start with the classic dough recipe below — one batch makes roughly twenty ornaments — then choose your designs. Every one of the twenty-four salt dough christmas ornaments here includes its materials and steps, from five-minute stamped snowflakes to a whole miniature village. Make them in November, and by December your tree tells your family’s story. That is what salt dough christmas ornaments do better than anything in a shop.
Table of Contents
- The Classic Salt Dough Recipe (Start Here)
- Handprint Santa Ornaments
- Glitter Star Ornaments
- Painted Tree Cutout Ornaments
- Stamped Snowflake Ornaments
- Cinnamon Gingerbread Men Ornaments
- Angel Ornaments
- Thumbprint Reindeer Ornaments
- Fingerprint Snowman Family Ornaments
- Red Heart Ornaments
- Metallic Bauble Round Ornaments
- Mini Wreath Ornaments
- Stocking Ornaments
- Mitten Ornaments
- Painted Candy Cane Ornaments
- Penguin Ornaments
- Owl Ornaments
- Village House Ornaments
- Lace-Imprint Vintage Ornaments
- Stamped Name Tag Ornaments
- Paw Print Ornaments
- Nativity Silhouette Ornaments
- Initial Letter Ornaments
- Button Tree Ornaments
- Cinnamon Heart Ornaments
- Frequently Asked Questions
- Final Thoughts: A Tree Full of Stories
The Classic Salt Dough Recipe (Start Here)
This is the only dough recipe you need for every design in this article. It rolls smoothly, cuts cleanly, bakes hard as ceramic, and keeps for decades once sealed — ornaments made from it in the 1990s are hanging on trees today, which is exactly why salt dough christmas ornaments outlive every trend that comes along.
Work the dough on a floured surface and roll to about 6 mm — thinner warps in the oven, thicker never quite dries in the middle. Remember the hanging hole before baking: a drinking straw makes the perfect punch. Leftover dough keeps a week in the fridge, wrapped airtight, for the next batch of salt dough christmas ornaments.
What You Need
- 2 cups (250 g) all-purpose flour
- 1 cup (300 g) fine table salt
- 1 cup (240 ml) warm water
- 1 tbsp vegetable oil (optional, for a smoother dough)
- Food coloring, or 2 tbsp ground cinnamon for the spiced variation
How to Make It
- Mix the flour and salt in a large bowl. Stir in the warm water (and oil, if using) until a shaggy dough forms.
- Knead on a floured surface for 5–8 minutes until smooth and firm like Play-Doh. Rest 20 minutes, wrapped.
- Roll to 6 mm, cut your shapes, and punch a hanging hole in each one with a straw.
- Bake at 100°C (210°F) for 2–3 hours, turning once, until rock hard and dry all the way through — thick pieces may need longer.
- Cool completely. Paint, seal with clear varnish or Mod Podge, thread with ribbon, and hang.
Handprint Santa Ornaments
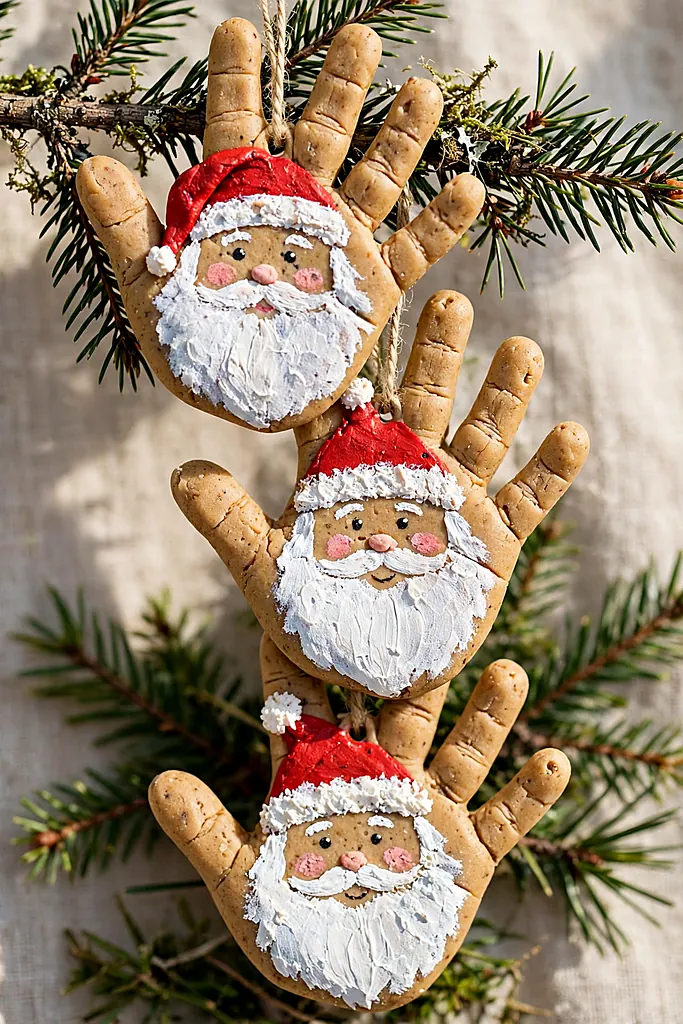
The undisputed king of keepsakes: a child’s hand pressed into dough, baked, and painted so the fingers become Santa’s beard and the thumb his hat’s brim. It captures a hand at exactly the size it will never be again, which is why these are the salt dough christmas ornaments that make grandparents cry on schedule.
Press the hand firmly and evenly — fingertips matter most. Write the child’s name and the year on the back before baking; in twenty years, that inscription will be the whole point. Of all salt dough christmas ornaments, this is the one to make every single year without exception.
What You Need
- One batch of classic salt dough (recipe above)
- Rolling pin and parchment
- Acrylic paints — red, white, peach, black, pink
- Fine paintbrushes
- Clear varnish or Mod Podge
- Red ribbon
How to Make It
- Roll the dough to about 8 mm — thicker than usual, to take a deep handprint.
- Press the child’s hand firmly into the dough and cut a neat oval or circle around the print.
- Punch the hanging hole at the top and bake as in the base recipe.
- Paint the fingers white as the beard, the palm peach as the face, and the thumb red as the hat.
- Add the face, seal with varnish, thread the ribbon, and write the year on the back. Of all salt dough christmas ornaments, the handprint is the one time cannot replace.
Keepsakes this personal are gifts too — more in these handmade christmas gift ideas.
Glitter Star Ornaments

Stars are the shape salt dough was born to be: five clean points, a face that takes glitter like it was designed for it, and a silhouette that reads from across the room. Gold for glamour, silver for frost, mixed for the tree that cannot decide — and should not have to.
What You Need
- Classic salt dough
- Star cookie cutters in two sizes
- Gold and silver glitter
- PVA glue or Mod Podge for coating
- Twine or metallic thread
- Clear sealant spray
Cut stars in two sizes and bake. While they cool, decide your finish: a full glitter coat for disco stars, or glitter only on the edges over white paint for the frosted kind — both are five-minute finishes. Stars are the salt dough christmas ornaments to make when the gift list is long.
Brush each star with glue, shower with glitter over a tray, and let dry before sealing; the sealant is what keeps glitter on the ornament instead of on every surface in your home until March. Stars are the fastest salt dough christmas ornaments to produce in gift quantities.
Glitter control: Seal glittered ornaments twice, letting the first coat dry fully. One coat sheds; two coats hold for years — and your floors will thank you every December.
Glitter belongs on the tree in bow form too — see these bows on christmas trees.
Painted Tree Cutout Ornaments
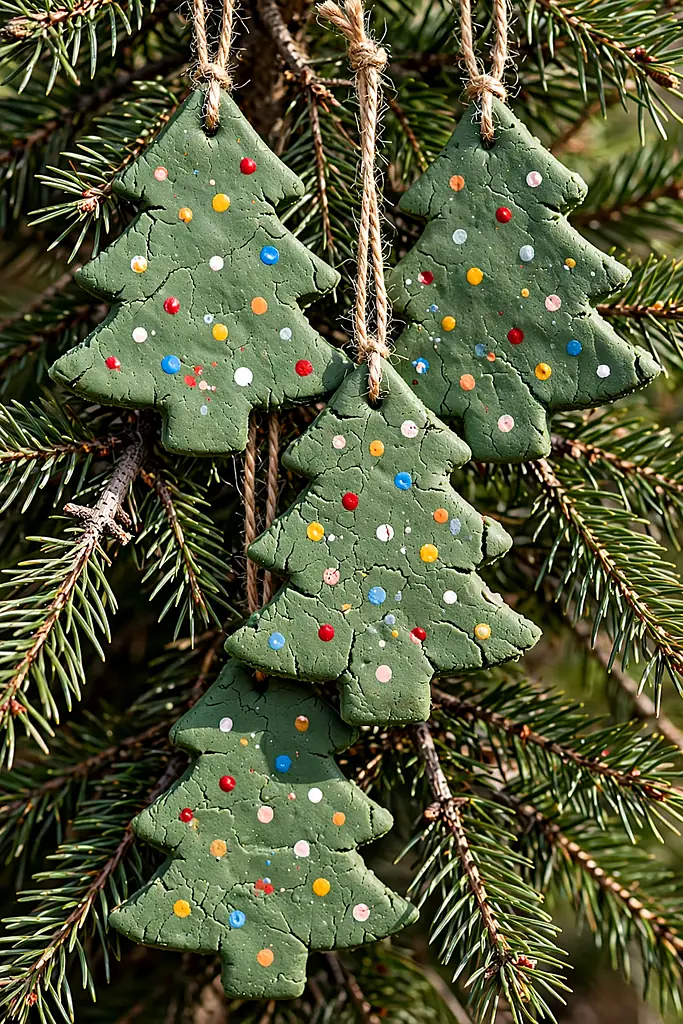
A Christmas tree on a Christmas tree: meta, charming, and the easiest painting project here, because a wobbly hand only makes them folk-arty. Paint them deep green and dot on baubles with a fingertip or a cotton bud — children can finish a dozen in the time adults finish two.
Vary the greens across the batch and the set looks designed. These are the salt dough christmas ornaments classrooms make by the hundred, and for good reason: one cutter, one color family, endless variations.
What You Need
- Classic salt dough
- Christmas tree cookie cutter
- Acrylic paints — greens, plus dot colors
- Cotton buds for dotting baubles
- Brown paint for trunks
- Twine and clear varnish
How to Make It
- Roll, cut tree shapes, punch holes and bake as in the base recipe.
- Paint the trunk brown and the foliage green; let dry.
- Dot on baubles and a star with cotton buds.
- Seal, thread with twine, and hang — tree-shaped salt dough christmas ornaments are the classroom classic.
At a Glance
A tree-covered tree suits a snowy theme — match it with these flocked tree decorating ideas.
Stamped Snowflake Ornaments
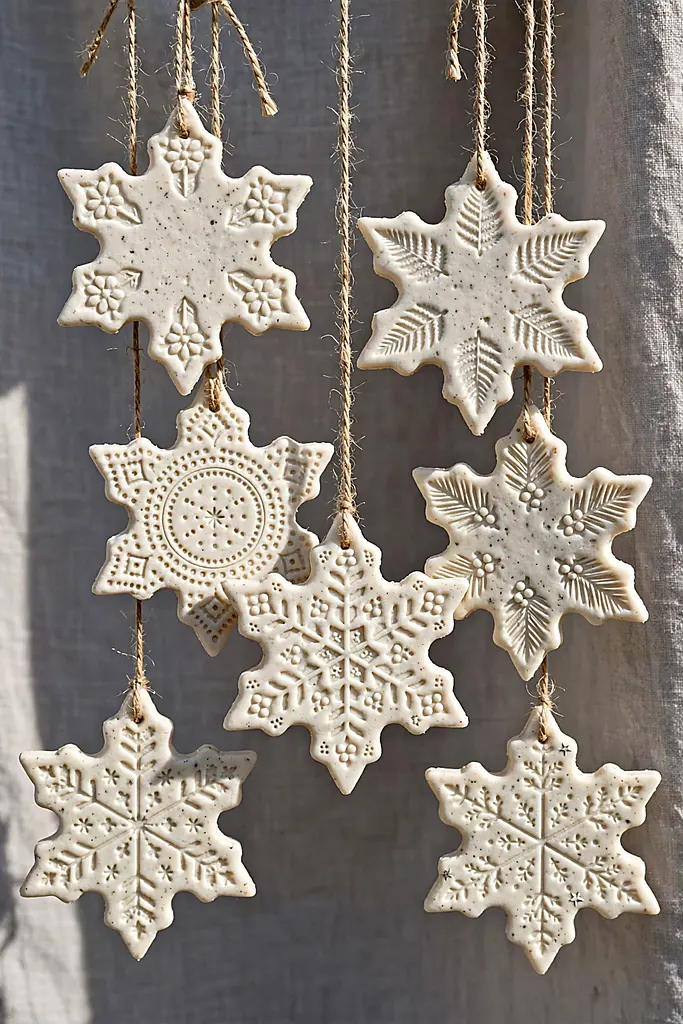
No painting skills required: snowflake shapes get their beauty from stamps pressed into the raw dough — doilies, lace, real snowflake stamps, even the patterned end of a glass. Baked white and left matte, they look like porcelain that costs real money, and they are the most elegant salt dough christmas ornaments on this list.
What You Need
- Classic salt dough
- Snowflake cookie cutters
- Lace, doilies or texture stamps for imprinting
- White acrylic paint (optional — raw dough is already pale)
- Silver thread
- Matte sealant
How to Make It
- Roll the dough and press the lace or stamp firmly into it before cutting.
- Cut the snowflakes out through the imprinted dough.
- Punch holes and bake low and slow so they stay pale.
- Paint white if you want the porcelain look, or leave natural.
- Seal matte, thread with silver, and hang where light rakes across the texture. Snowflakes are the salt dough christmas ornaments to make when elegance matters more than color.
Delicate makes belong with delicate crafts — these diy christmas snow globes agree.
Cinnamon Gingerbread Men Ornaments

Add cinnamon to the dough and it bakes into gingerbread-colored men that smell like Christmas for years — the only ornaments that perfume the tree. Paint on the icing details with white acrylic and a fine brush, and hang them anywhere except a house with determined toddlers, because they look entirely edible.
What You Need
- Salt dough with 2 tbsp ground cinnamon added
- Gingerbread man cookie cutter
- White acrylic paint and a fine brush
- A pinch of ground cloves (optional, for scent)
- Red ribbon
- Matte sealant
Mix the cinnamon into the flour before adding water; the dough will be speckled brown and smell extraordinary before it even bakes. Spiced salt dough christmas ornaments perfume the tree for years. Cut, hole and bake as usual — spiced dough behaves exactly like plain.
Paint the icing lines with a steady hand: wavy cuffs, dot eyes, a smile. Imperfections read as homemade charm here, not error. These salt dough christmas ornaments store scented for years; refresh a faded one with a drop of cinnamon oil on the back.
Hang them in the kitchen or on the tree nearest the kitchen, where the scent belongs. Just warn guests before someone learns the hard way that they are not, in fact, cookies.
For the edible versions, bake these christmas cookies alongside.
Angel Ornaments

Angels are the ornament grandmothers collect, and the dough version — a simple cone body, round head, and wings stamped or cut separately — has a folk purity the porcelain ones often lack. Painted white with gold edges, they glow against dark green branches like they have their own small light source.
Make the wings from a heart cutter cut in half, or press a leaf shape twice. An angel is among the most gifted salt dough christmas ornaments there are: they suit memorial ornaments as beautifully as festive ones, carrying a name on the back with grace.
What You Need
- Classic salt dough
- Heart or leaf cutter for wings
- Gold acrylic paint
- White acrylic paint
- Fine brush for faces (or leave faceless, folk-style)
- Gold thread and clear varnish
Form a simple cone for the body and a small ball for the head, joining with a dab of water. Cut two wings and press them to the back, scoring the joins so they hold in the oven.
Bake, then paint white all over and edge the wings and hem with gold. Leave the face blank for the classic folk look, or add two dot eyes. Either way, an angel earns the tree’s highest branch more often than the star does. Angel salt dough christmas ornaments are given at christenings and Christmases alike.
Angels preside over decorated rooms — set theirs with these christmas decor ideas.
Thumbprint Reindeer Ornaments

A thumb pressed into a round of dough becomes a reindeer’s face with the addition of painted antlers and one red nose. Each print is a different size and a different child, which makes a set of them a family portrait in disguise — and one of the fastest salt dough christmas ornaments ever devised.
What You Need
- Classic salt dough
- Round cutter
- Brown, red and black acrylic paint
- Fine brushes
- Googly eyes (optional)
- Twine and varnish
How to Make It
- Cut rounds, press a thumb firmly in the center of each, punch holes and bake.
- Paint the thumbprint brown as the reindeer’s head.
- Add antlers in darker brown, ears, and a red nose at the print’s base.
- Dot the eyes (or glue googly ones), seal, and thread with twine. A set of reindeer salt dough christmas ornaments is a family portrait in disguise.
At a Glance
Reindeer multiply at swaps — trade them at a cookie exchange table too.
Fingerprint Snowman Family Ornaments
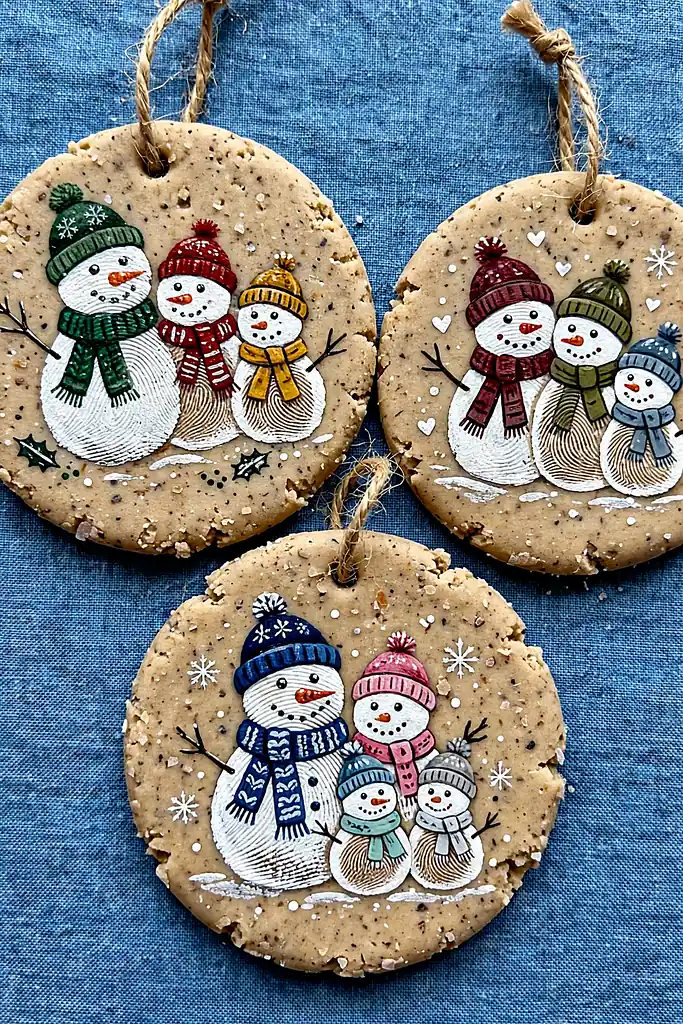
Three fingerprints in a descending row become a snowman; a whole set of ornaments, one per family member, becomes the snowman family — each person’s own prints stacked as their snowperson, labeled underneath. It is a Christmas card, a portrait and an ornament in one flat disc of dough.
Paint the disc a deep blue first so the white snowmen glow like a night scene. These salt dough christmas ornaments are the ones families remake when a new baby arrives, adding the tiniest snowman of all.
What You Need
- Classic salt dough
- Large round or oval cutter
- Acrylic paints — navy, white, orange, scarf colors
- Fine brushes
- A permanent fine marker for names
- Ribbon and varnish
How to Make It
- Cut large ovals and bake — the painting carries this design.
- Paint the whole disc navy and let it dry fully.
- Press white-painted fingertips in a stack of three to form each snowman.
- Add hats, scarves, carrot noses and coal dots with a fine brush.
- Write each family member’s name beneath their snowman, seal, and hang. Snowman salt dough christmas ornaments get remade whenever the family grows.
Order matters: Paint the biggest snowman first and work down to the baby. Fingertips vary more than you expect, and the smallest print should be saved for the smallest person.
A snowman family is a mother’s favorite — more for her in these christmas gift ideas for mom.
Red Heart Ornaments

Hearts are Christmas’s second shape: love, home, the whole reason for the season’s gathering. Dough hearts painted deep red with white dots or stripes are the easiest win on this list — one cutter, one hero color, and a finish that looks like Scandinavian folk art even when a five-year-old holds the brush.
What You Need
- Classic salt dough
- Heart cookie cutters in mixed sizes
- Red and white acrylic paint
- A dotting tool or pencil end
- Twine
- Gloss varnish
Cut hearts in two or three sizes and bake. Paint them all red first — a uniform red set looks intentional even before the decorating starts, which is the folk-art secret nobody mentions. Hearts are the salt dough christmas ornaments to batch for a whole gift list at once.
Dot or stripe in white once the red is dry, varying the pattern heart by heart. Gloss varnish makes them look lacquered. Hearts are the salt dough christmas ornaments to give couples, teachers and anyone whose year needs the message.
Hearts and handmade go together — hang yours near these diy christmas wreath ideas.
Metallic Bauble Round Ornaments
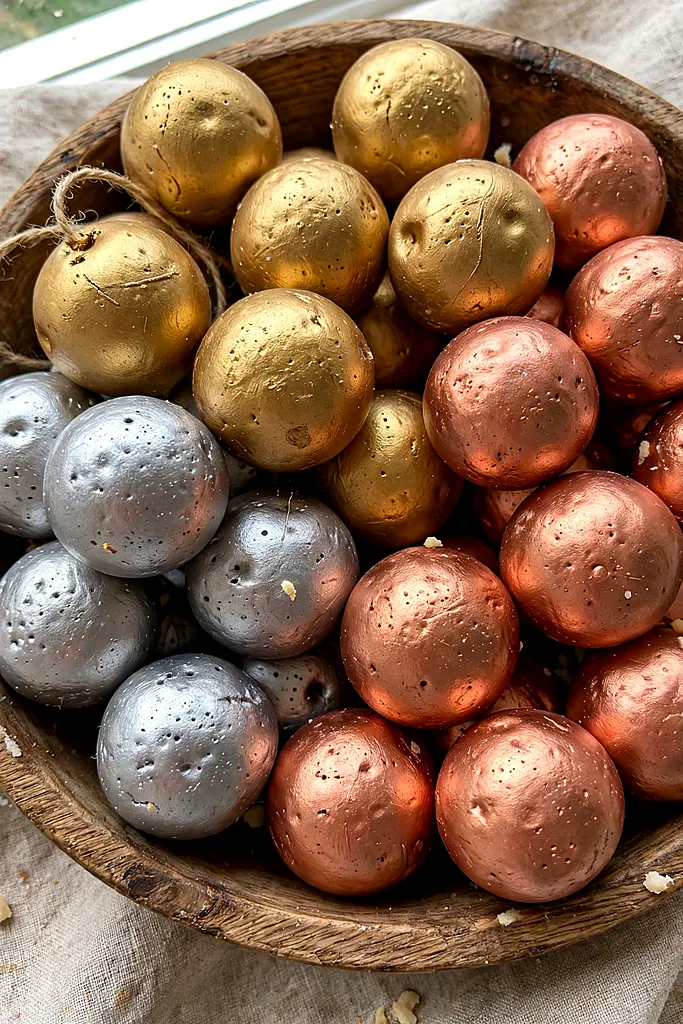
Plain rounds, transformed by metallic paint into baubles that match the expensive sets: gold, copper, rose gold and silver, with a painted or glued cap at the top to complete the illusion. Grouped in a bowl as a centerpiece, nobody believes they began as flour and salt.
The trick is two thin coats of metallic paint and a real bauble cap or a dough one, painted to match. As salt dough christmas ornaments go, these are the most convincing impersonators of shop-bought luxury.
What You Need
- Classic salt dough
- Round cutters
- Metallic acrylic paints — gold, copper, silver, rose gold
- Spare bauble caps or thick dough tops
- Strong glue
- Ribbon and gloss varnish
Cut rounds slightly thicker than usual so they read as baubles, not biscuits, and bake them fully hard. Metallic paint shows every bump, so sand any rough edges smooth first.
Paint two thin coats, letting each dry. Glue the cap at the top beside the hanging hole, thread with ribbon, and gloss. In a bowl or on dark branches, these pass for glass until someone picks one up — and even then, the weight feels reassuringly real. They are the salt dough christmas ornaments most often mistaken for the real thing.
At a Glance
Metallic shine is a luxury language — speak it fluently with these luxury christmas decor ideas.
Mini Wreath Ornaments
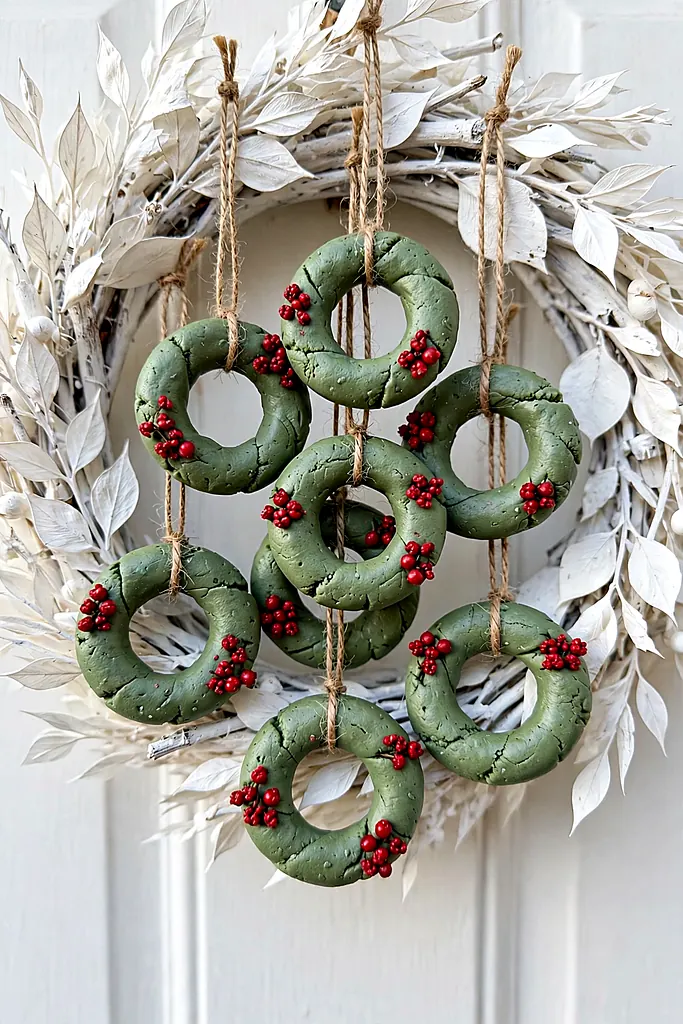
A wreath the size of your palm: a dough ring, textured with a fork or a leaf stamp to suggest foliage, painted green and dotted with red berries. They are the most giftable shape here — one per colleague, teacher or neighbor — and a row of them along a garland looks like you planned your whole December around it.
What You Need
- Classic salt dough
- Two round cutters (one large, one small, for the ring)
- A fork or leaf stamp for texture
- Green and red acrylic paint
- Thin red ribbon for mini bows
- Varnish
How to Make It
- Cut large circles, then cut the centers out with the small cutter to form rings.
- Texture the ring all over with fork marks or leaf stamps.
- Punch the hanging hole and bake.
- Paint green, dot on red berries, and let dry.
- Add a tiny bow at the top, seal, and hang. A row of mini wreath salt dough christmas ornaments along a garland looks professionally planned.
Berry spacing: Dot the berries with a paint-soaked cotton bud, not a brush — round dots every time, and space them a thumb’s width apart.
The full-size inspiration lives in these christmas decorations.
Stocking Ornaments

Stockings personalize beautifully: one per family member, name painted or stamped along the cuff, colors matched to their real stockings if you are that household. Hung in a row on the mantel garland, they are the family’s Christmas lineup in miniature.
Cut them generously — names need room — and let each person paint their own. A set of stocking salt dough christmas ornaments grows by one whenever the family does, which turns the garland into a family tree you can hang.
What You Need
- Classic salt dough
- Stocking cookie cutter (large)
- Acrylic paints in family colors
- A fine brush or letter stamps for names
- White paint for cuffs
- Ribbon and varnish
How to Make It
- Cut large stockings, punch holes and bake.
- Paint the cuff white and the body in each person’s color.
- Add the name along the cuff with a fine brush or stamps.
- Seal, thread, and hang in family order — stocking salt dough christmas ornaments grow by one whenever the family does.
Stockings belong at parties too — hang yours at one of these friendsmas party ideas.
Mitten Ornaments
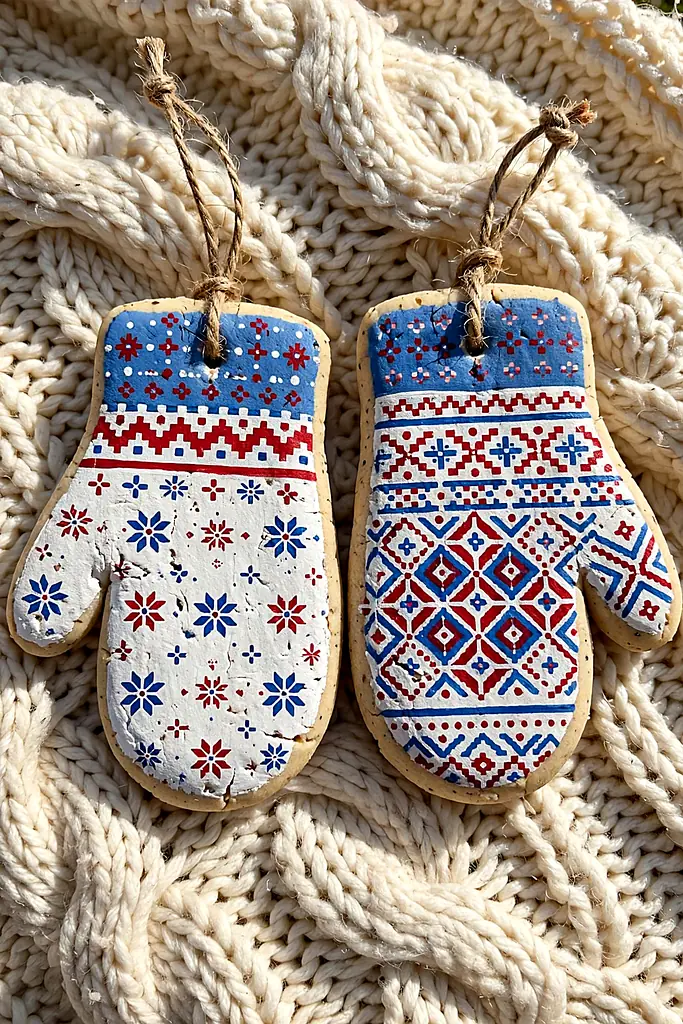
Mittens come in pairs, and so should these: two dough mittens tied together with real yarn, painted in fair-isle bands of pattern. They are the coziest-looking ornaments imaginable and the ones most likely to be photographed for the family chat before they even reach the tree.
What You Need
- Classic salt dough
- Mitten cookie cutter
- Acrylic paints — reds, whites, blues for fair-isle bands
- A fine brush for pattern rows
- Real yarn to tie the pair
- Varnish
Cut the mittens in mirrored pairs — flip the cutter for the second of each pair so thumbs face correctly; a pair of left mittens is the classic beginner’s heartbreak.
Paint a white cuff, then bands of simple pattern: stripes, dots, zigzags, tiny hearts. Tie the finished pair together with yarn through their holes. Mitten salt dough christmas ornaments photograph beautifully for the family chat. Mitten salt dough christmas ornaments in a cold-climate household get a laugh every single year.
Pair check: Lay both mittens out before painting and confirm the thumbs mirror each other. Paint cannot fix a pair of lefts — but a single mitten makes a fine gift tag.
Mittens are winter wear in miniature — coordinate with these scarf outfits.
Painted Candy Cane Ornaments
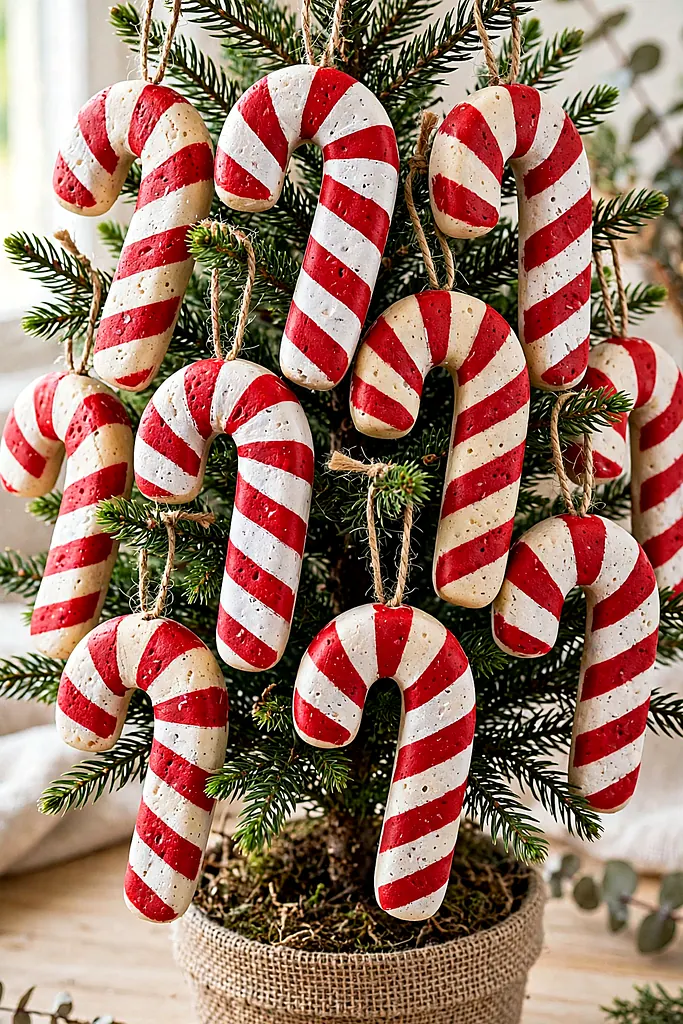
The candy cane is the easiest shape to roll by hand — a dough snake bent at the top — and the most satisfying to paint, because the red stripes forgive nothing and reward everything. Twist two ropes of dough (one tinted pink-red) before shaping, and the stripes bake in with no painting at all.
Either way, they hang in cheerful rows and cost nothing. Striped salt dough christmas ornaments are also the best sellers at every school craft fair, should your December need funding.
What You Need
- Classic salt dough (half tinted red, if twisting)
- Red and white acrylic paint (if painting stripes)
- A fine brush
- Red ribbon
- Gloss varnish
How to Make It
- Roll dough snakes about 1 cm thick and 15 cm long; bend the top into the cane hook.
- For twisted canes, twist one plain and one red rope together before bending.
- Bake until fully hard.
- Paint stripes on plain canes diagonally, following the classic spiral.
- Gloss, ribbon, and hang in a row. Rows of candy cane salt dough christmas ornaments sell out first at every craft fair.
At a Glance
Stripes dress a table too — see these christmas table decorations.
Penguin Ornaments
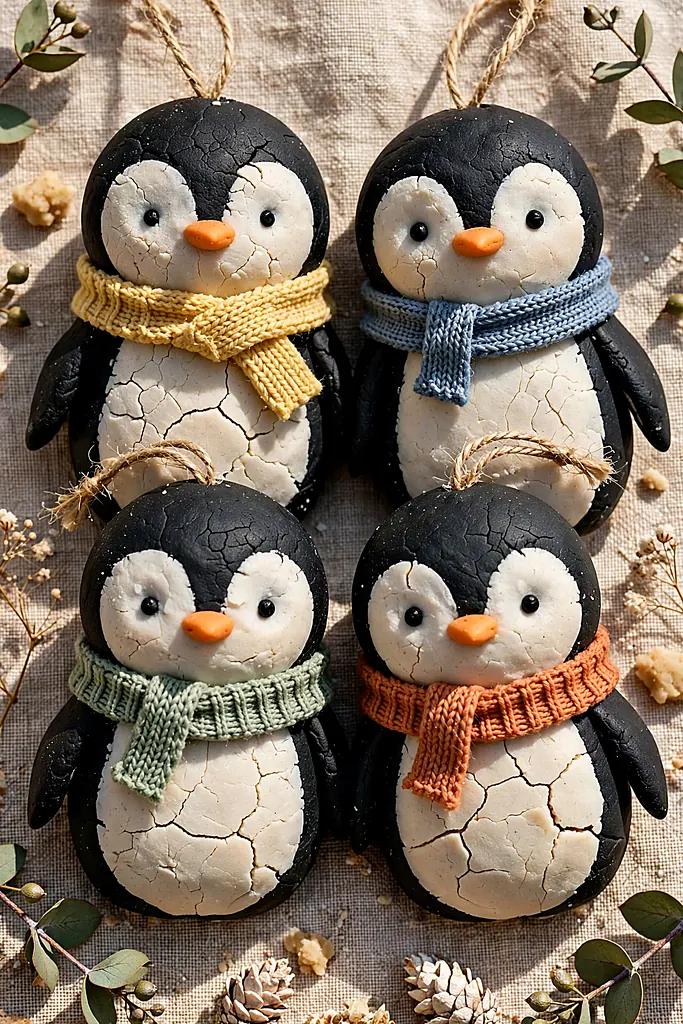
An oval of dough, a black body, a white belly, and a scarf in any color you love: penguins are the ornament children request by name. Their simplicity is their charm — three paint colors and a dot of orange — and a whole colony marching along a low branch is the tree’s best neighborhood.
What You Need
- Classic salt dough
- Oval cutter or a glass
- Black, white and orange acrylic paint
- Scarf colors of your choice
- Fine brushes
- Twine and varnish
How to Make It
- Cut ovals, punch holes at the top and bake.
- Paint the whole oval black; let it dry.
- Paint a white belly oval and a white face patch.
- Add dot eyes, an orange triangle beak, and a bright scarf band.
- Seal, thread, and march them onto the tree. A colony of penguin salt dough christmas ornaments is the tree’s best neighborhood.
Colony rule: Penguins look ten times better in a group of five or more, scarves all different. A lone penguin is a statement; a colony is a party.
Penguins approve of cozy rooms — build theirs from these cozy winter living room decor ideas.
Owl Ornaments
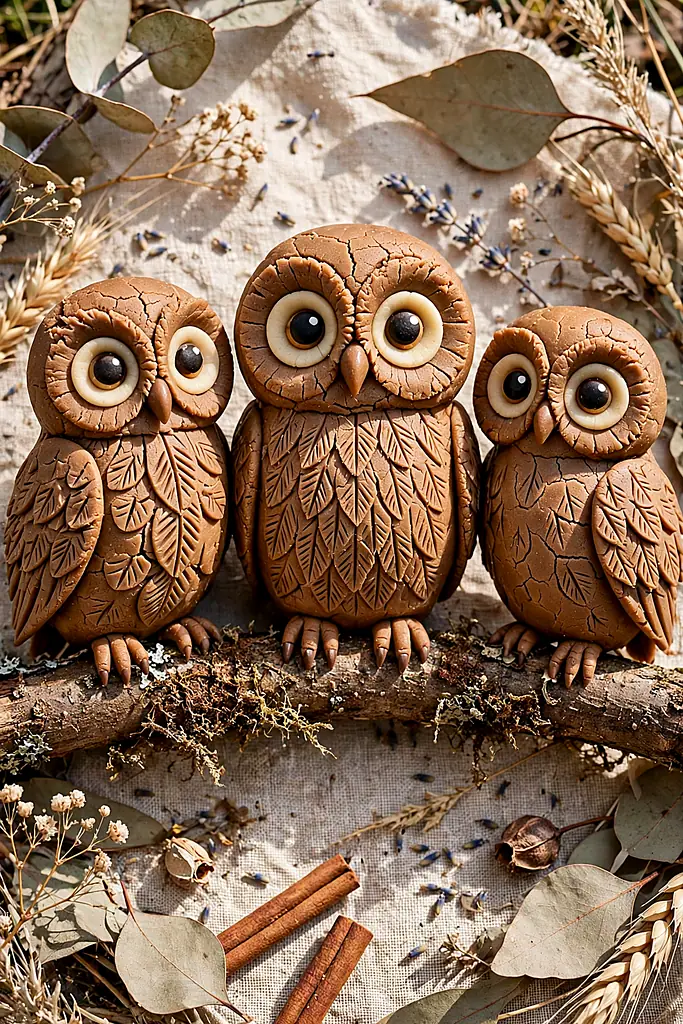
Owls bring the woodland to the tree: round dough discs with big stamped or painted eyes, feather marks scored with a fork, and a wisdom that flatters any branch. Browns and creams keep them rustic; a glittered few make them glamorous. Either way, they are the ornament adults quietly claim as their own favorite.
Score the feather pattern before baking — paint alone looks flat by comparison. Owl salt dough christmas ornaments suit the family’s readers and night-owls, especially with a name on the back and a tiny book painted under one wing.
What You Need
- Classic salt dough
- Round cutter
- A fork for feather scoring
- Brown, cream and gold acrylic paint
- Bottle caps for stamping eye rings
- Twine and matte varnish
Cut rounds and score curved rows of feather marks with the fork before baking; stamp two bottle-cap rings as the eye surrounds while the dough is raw.
Paint in warm browns, keeping the belly lighter, then fill the eye rings with cream and add big dark pupils with a hint of gold. Matte varnish suits owls best — gloss makes them look startled. Owl salt dough christmas ornaments are the ones adults quietly claim as their own.
Eye trick: Stamp the eye rings into the raw dough with a bottle cap. Painted-on eyes wander; stamped rings keep every owl’s gaze steady and wise.
At a Glance
Woodland creatures suit collected rooms — more in these vintage home decor ideas.
Village House Ornaments
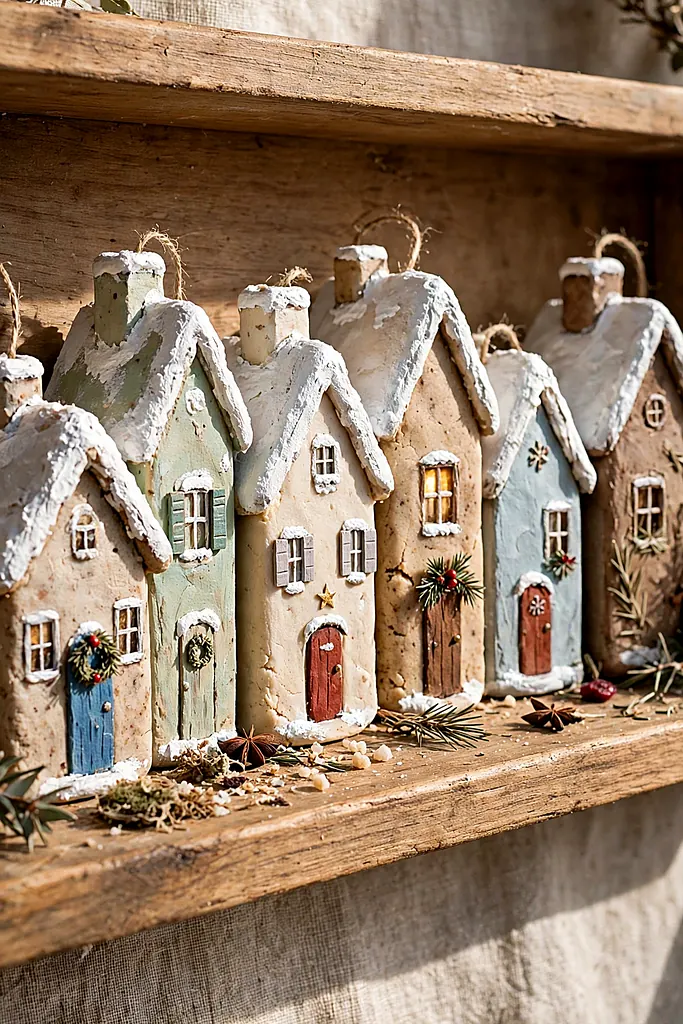
A row of tiny houses — snowy roofs, lit windows, doors all different colors — turns a shelf or mantel into the village every Christmas card promises. Each house is a flat cutout with painted detail; together they are the most display-worthy project here, and the one most likely to become a permanent collection.
What You Need
- Classic salt dough
- House cookie cutter or a knife and ruler
- Acrylic paints — house colors, white for snow
- Fine brushes
- A pinch of glitter for rooftops (optional)
- Twine and varnish
Cut simple house shapes — a square, a triangle roof — in two or three sizes. Bake them fully hard; houses warp if rushed, and a leaning village has a certain charm but also a short life.
Paint each house a different color, snow the roofs white, and dot warm yellow windows. A village looks best odd-numbered: five or seven houses, varied heights. These salt dough christmas ornaments deserve a mantel parade, not just a branch.
Add one new house each year, dated on the back, and the village becomes a family chronicle — the year of the blue house, the year the roof glittered.
Roof snow: Dab white paint along the roofline with a dry brush, heavier at the ridge. Wet, smooth paint reads as icing; dry-brushed reads as snow that just fell.
A village needs an entry to welcome it — start with these hallway table decor looks.
Lace-Imprint Vintage Ornaments
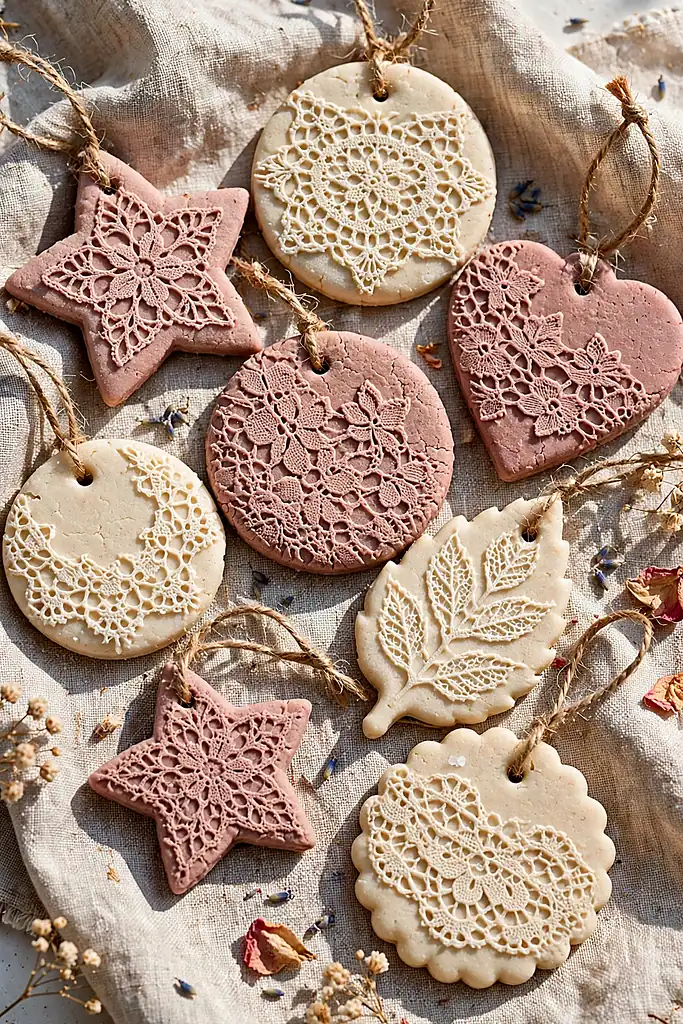
Roll the dough over real lace and the pattern transfers like a fossil: doily lace, crochet edges, even a grandmother’s actual tablecloth lace (photograph it first, use a spare piece). Left cream and dusty rose, these are the ornaments that look inherited — the highest compliment handmade can earn.
Lace imprints need no painting beyond a wash of diluted color in the grooves, wiped back so the pattern darkens and the surface stays pale. Vintage salt dough christmas ornaments suit the family’s keeper of heirlooms, and pair beautifully with the stamped snowflakes.
What You Need
- Classic salt dough
- Pieces of lace or doilies
- Round and oval cutters
- Diluted dusty-rose or sepia paint for the wash
- A soft cloth for wiping back
- Cream ribbon and matte sealant
How to Make It
- Roll the dough, lay the lace on top, and roll again firmly to imprint; peel the lace away and cut shapes from the imprinted dough.
- Punch holes and bake low to keep them pale.
- Brush the diluted wash over each piece and wipe the surface back so color stays in the grooves.
- Seal matte, thread with cream ribbon, and hang. Lace salt dough christmas ornaments look inherited the day they are made.
Lace choice: Bold, open lace patterns imprint best. Fine dense lace turns to mush at ornament scale — test one piece of dough before committing the batch.
Imprinted textures are wall art too — explore these diy wall art projects.
Stamped Name Tag Ornaments

Ornaments that work for a living: dough rounds stamped with names, tied onto presents as gift tags that survive the unwrapping and hang on the tree for decades after. Every recipient keeps theirs — a gift tag with a destiny — which makes them the most efficient making on this entire list.
What You Need
- Classic salt dough
- Round or tag-shaped cutters
- Letter stamps or a fine skewer for writing
- Acrylic paint (optional — natural looks chic)
- Red ribbon
- Matte sealant
How to Make It
- Cut tag shapes slightly thick — they must survive present duty.
- Stamp each name into the raw dough, deep and clear.
- Punch the hole, bake until fully hard.
- Leave natural or wash with one color; seal matte, then tie onto gifts with ribbon — name-tag salt dough christmas ornaments are the gift tags nobody throws away.
Stamp depth: Press names deeper than looks necessary. Dough swells a fraction in the oven and paint fills grooves — shallow stamps vanish, deep ones stay legible for decades.
Tags pair with handmade gifting — complete the set with how to make soap as the present itself.
Paw Print Ornaments
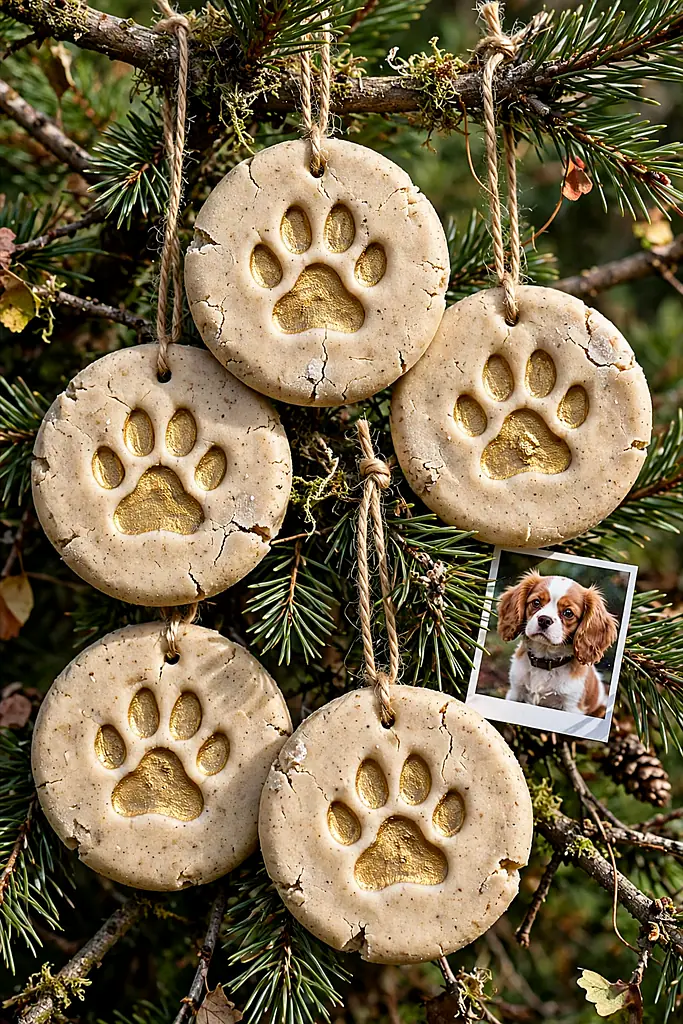
The dog or cat presses a paw into dough (bribed with treats, wiped immediately after), and the print gets painted — gold for the goodest pets, which is to say all of them. It is the pet’s own ornament on the family tree, and the one guests ask about first, every time.
Work fast, one paw, one ornament, treats at the ready. A paw salt dough christmas ornaments belongs in every pet household’s December, and making one per year builds the sweetest timeline on the tree.
What You Need
- Classic salt dough
- Large round cutter
- Your pet, plus treats and a damp cloth
- Gold or silver acrylic paint
- A fine brush
- Ribbon and varnish
Roll a thick round and place it on a tray at floor level. Guide one paw into the center with a gentle press — treats before and after, and wipe the paw clean immediately; the dough is salty and not a snack.
Bake the print hard. Paint the whole ornament, then paint inside the paw impression in gold so the print glows. Write the pet’s name and year on the back. Failed prints (there will be one) become garden stones. Paw salt dough christmas ornaments earn the pet a place on the family tree.
Paw safety: Wipe the paw clean the second the print is made, and never let the pet lick the dough — it is far too salty to be a snack, however hopeful the face.
Family trees include the four-legged — celebrate everyone at these friendsgiving table settings.
Nativity Silhouette Ornaments

The reason for the season, in silhouette: a stable, figures and a star, cut or painted in deep navy against gold — or painted as black silhouettes on cream. Dough takes a silhouette beautifully because the shape does all the work, and these hang with a quiet gravity the glitter stars happily make room for.
What You Need
- Classic salt dough
- Nativity cookie cutters, or a template and craft knife
- Navy and gold acrylic paint (or black on cream)
- Fine brushes
- Gold thread
- Varnish
How to Make It
- Cut the nativity shapes — from cutters, or trace a printed template with a craft knife.
- Punch holes and bake until hard.
- Paint the deep background color first and let it dry fully.
- Add the silhouettes and star in the contrast color with a steady hand.
- Seal, thread with gold, and hang in a place of honor. Nativity salt dough christmas ornaments carry the season’s meaning in miniature.
At a Glance
The nativity anchors the room’s meaning — surround it with these christmas living room decorations.
Initial Letter Ornaments

Letters spell the season any way you like: JOY across the mantel, PEACE on the tree, or one initial per family member in matching colors. Dough letters bake into chunky, satisfying shapes that take paint and pattern beautifully — dots, stripes, or one flat color with gold edges.
Cut them thick; thin letters snap at their narrow points in the oven and in the box. Letter salt dough christmas ornaments also solve the office Secret Santa forever: an initial ornament in the recipient’s favorite color reads thoughtful at any budget.
What You Need
- Classic salt dough
- Letter cookie cutters
- Acrylic paints in your scheme
- Gold paint for edging
- Twine or ribbon
- Varnish
How to Make It
- Roll the dough thicker than usual — at least 8 mm for letters.
- Cut the letters and smooth every edge with a wet fingertip.
- Punch holes carefully in a sturdy part of each letter and bake low and long.
- Paint your design; edge in gold for the finished look.
- Seal, thread, and spell something worth hanging. Letter salt dough christmas ornaments are also the fastest personalized gift in this list.
Breakage insurance: Letters snap at their narrow joins, so roll letter dough a full 8 mm and never rush the drying. A thick letter survives decades of Decembers.
Lettered crafts charm crafters — if letters please you, these crochet patterns for beginners are next.
Button Tree Ornaments
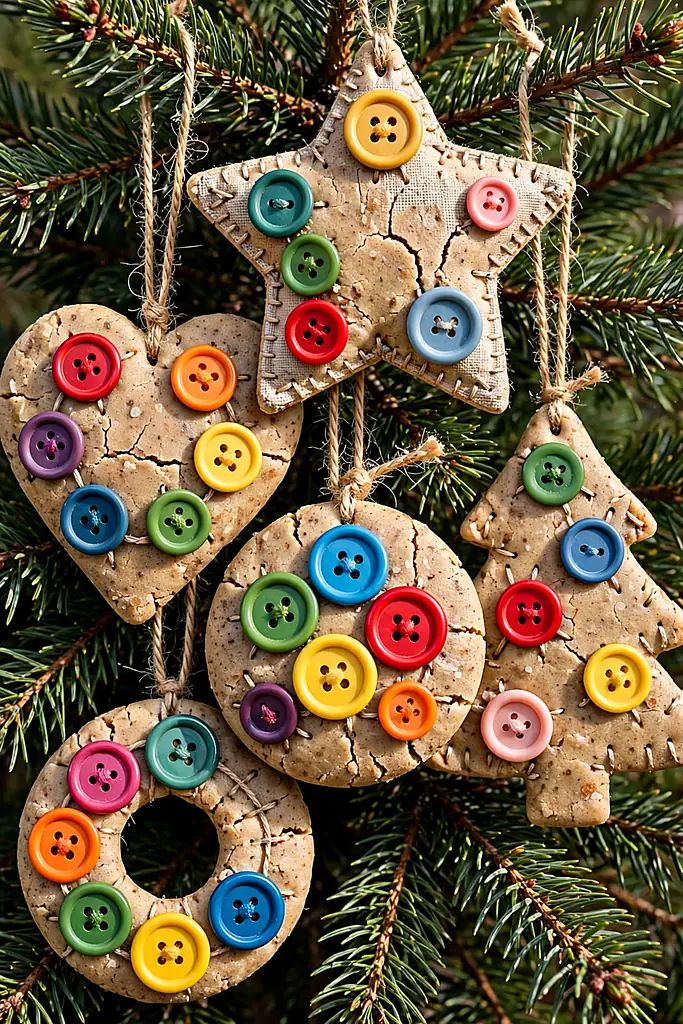
For the sewing basket’s revenge: tree-shaped dough ornaments studded with real buttons pressed in before baking — grandma’s button tin, deployed at last. The buttons sink in as the dough bakes around them, emerging as jeweled trees that weigh pleasingly and jingle faintly against the branches.
What You Need
- Classic salt dough
- Christmas tree cutter
- Assorted buttons in greens, reds and golds
- Green acrylic paint (optional undercoat)
- Twine
- Varnish (avoid the button faces)
Cut the trees and press the buttons firmly into the raw dough in rows or joyful disorder — they must sit deep, half-sunk, so the baking dough grips them. Button trees are the salt dough christmas ornaments a sewing basket was born to make. Bake as usual; most buttons survive low heat happily, but avoid delicate plastics.
Paint around the buttons if you want a green undercoat, or leave the dough natural for the rustic version. These salt dough christmas ornaments are the sewing circle’s signature gift, and every one is genuinely one of a kind.
At a Glance
Buttons and mirrors share a craft soul — see these diy sunburst mirror ideas.
Cinnamon Heart Ornaments

The rustic finale: cinnamon dough hearts, left unpainted and rough-edged, a star anise pressed into each center, tied with jute. They scent the tree, suit the farmhouse and Scandi houses equally, and look like something sold in a Copenhagen Christmas market for real money.
Make a double batch; these disappear as gifts faster than any painted piece. Unpainted spiced salt dough christmas ornaments are also the fastest finish here — cut, bake, tie, done — which makes them the eleventh-hour ornament of champions.
What You Need
- Salt dough with 3 tbsp ground cinnamon and 1 tsp cloves
- Heart cutters
- Star anise, one per heart
- Jute twine
- A rolling pin with texture (optional)
- No paint, no varnish — keep them matte and scented
Mix the spices into the flour before adding water and knead until the color is even all the way through — the dough should smell like a bakery before it ever meets the oven.
Roll, cut hearts, and press a star anise into the center of each. Punch the holes, then bake low until hard; spiced dough darkens as it bakes, so watch the last half hour.
Thread with jute twine in a simple loop. No paint, no varnish — matte and scented is the whole point. Cinnamon hearts are the salt dough christmas ornaments to make on the very last crafting day.
Cinnamon belongs in the kitchen too — bake these apple pie biscuits while the ornaments dry.
Frequently Asked Questions
How long do salt dough christmas ornaments last?
Decades, if they are baked fully dry and sealed. The enemies are moisture and underbaking: a ornament that feels even slightly soft in the middle will eventually mold or crumble. When in doubt, bake longer at the lowest heat — patience in the oven is what makes salt dough christmas ornaments heirlooms.
Why did my ornaments puff up or crack?
Puffing means the oven was too hot and steam had nowhere to go; cracking means the dough dried unevenly or was rolled with air pockets. Roll firmly, prick thick pieces with a pin, and always bake low and slow. A cracked ornament is not ruined — it is rustic, and paint hides a multitude of cracks.
Can I make them with children?
Salt dough is the classic children’s craft for a reason: non-toxic ingredients, forgiving texture, and results worth keeping. Children can roll, cut, press handprints and paint. Adults should handle the oven and the varnish, and everyone should wash hands after — the dough is far too salty to nibble.
How do I store them between Christmases?
Wrap each ornament in tissue and store them flat in a rigid box with a silica packet, somewhere dry and room-temperature. Attics that bake in summer and damp basements are the two worst addresses for salt dough christmas ornaments; a wardrobe shelf is ideal.
Can I scent the dough with other spices?
Yes — ginger, mixed spice, cloves and even cocoa powder all work, tinting the dough as they scent it. Keep total added spice under about four tablespoons per batch or the dough weakens. Scented salt dough christmas ornaments keep their perfume for years stored in a closed box.
What paint and sealer work best?
Acrylic paint is the standard: cheap, bright, and permanent once dry. Seal with clear varnish, Mod Podge or PVA for a softer finish. Seal the back too, not just the painted front — sealing all over is what keeps salt dough christmas ornaments hard and bright for decades.
Final Thoughts: A Tree Full of Stories
Twenty-four designs, one bag of flour, and a tree that now holds your family’s actual fingerprints. That is the quiet magic of making your own ornaments: the tree stops being decorated and starts being documented, one small salt-dough year at a time.
Start with the handprint if there is a small hand available — there will not always be — and let the collection grow a design or two each November. In ten years your box of salt dough christmas ornaments will be the most valuable thing you own that money cannot replace. And every December, hanging them, you will make the same discovery all over again: the best salt dough christmas ornaments are never the perfect ones.
More from The Glossy Guide
 DIY & Craft
22 Stunning DIY Shadow Box Ideas That Turn Keepsakes Into Beautiful Wall Art
Every home has a drawer of things too precious to throw away and too awkward to display: the baby shoes,…
 DIY & Craft
13 DIY Sunburst Mirror Ideas That Make a Wall Look Expensive
A sunburst mirror is the hardest-working decoration a wall can wear: it bounces light, fakes a window, and turns a…
 DIY & Craft
16 DIY Christmas Wreath Ideas to Make Your Front Door the Best on the Street
A wreath is the handshake of a house in December — the first thing guests see and the thing the…